Archive for the ‘Uncategorized’ Category

Mallory is a comfortable python based man in the middle tool. Using a patched version (mallory.diff) version with PyOpenSSL sockets adds SNI support.

Importing the ca certificate (mallory/src/ca/ca.cer) into a mobile device, allows to see all ssl encrypted traffic of the mobile device. (Import: either upload ca.cer to a webserver or send it as an email attachment; clicking on ca.cer installs the ca certificate.)

Installation on a raspberry pi with raspbian and configured access point:

apt-get install mercurial
apt-get install python2.7-dev python-setuptools
apt-get install python-pyasn1 python-netfilter libnetfilter-conntrack-dev
easy_install pynetfilter_conntrack
# ??? apt-get install libnetfilter-conntrack3-dbg

hg clone http://bitbucket.org/IntrepidusGroup/mallory
ln -s /usr/lib/arm-linux-gnueabihf/libnetfilter_conntrack.so /usr/lib/libnetfilter_conntrack.so.1

apt-get install python-pip python-m2crypto python-qt4 pyro-gui
apt-get install libffi-dev
pip install pyopenssl
apt-get install python-twisted-web python-qt4-sql libqt4-sql-sqlite sqlite3
pip install netlib
apt-get install python-imaging
apt-get install python-paramiko

Apply patch (which uses some code of this fork, especially the global config class commit, restoring of iptables when closing mallory gui. additionally it transfers code of mitmproxy into mallory to get SNI support)

Instructions to get started with mallory can be found here and here. – Acquiring of dhcp leases on client side currently only works when mallory gui is closed.

The rules and the streams tab in mallory gui might be unreliable. But mallory writes all packets into a sqlite3 database, which can be browsed on the advanced tab (db view, create sql, then execute).  – You could use sqlitebrowser as gui to view the data (apt-get install sqlitebrowser).

ipt.sh mallory2.diff mallory2cap.py.diffOn the bottom of this article you find a script which converts the mallory sqlite db into a pcap file which can be read by wireshark. (here with some error handling added: patch)

This patch adds a plugin to mallory to download the ca certificate at http://ip_of_mallory_host:8080. (Furthermore this patch fixes some issues in http.py)

The script ipt.sh allows to start and stop port redirection for mallory. This script and mallory (cd mallory/src; python mallory.py) have to be run as root. The mallory gui (cd mallory/src; python launch_gui.py) runs as normal user, if port redirection is done by ipt.sh.

  • BerryBoot allows to put multiple operating systems on one sd card.
  • the low power micro wifi adapter edimax ew-7811un is used in accesspoint mode
  • PirateBox 1.01 exists as arch linux based raspberry pi image

Install BerryBox (reference)

  • download latest berryboot zip archive from sourceforge
  • reformat an sd card with one fat32 partition
  • copy the contents of the zip archive into this partition
  • attach screen, mouse and wired ethernet to raspberry pi and boot from sd card
  • follow the instructions and install one “standard os”, e.g. “webserver”

Install PirateBox raspberry pi image

  • download latest piratebox raspberry pi image (ArchLinuxARM) from downloads.piratebox.de (using a bit torrent client like deluge)
  • this image has to modified on a linux machine (e.g. ubuntu 14.04 lts):
    /lib and /sbin which are symbolic links in the image have to be changed to real directories (reference)
    the resulting root partition has to be copied into a squash filesystem (reference)
  • unzip the image and use kpartx as helper to mount the second partition
    kpartx -av filename_of_unpacked_image
    mount /dev/mapper/loopNp2 your_mountpoint (with N=0, 1, 2 … as displayed by kpartx
  • use mc, navigate to the root directory of the mounted image.
    i) Remove the symlinks lib, bin  and sbin.
    ii) Move usr/lib to the root directory of the image; also move usr/bin to the root directory of the image.
    iii) Inside the root directory of the image rename bin to sbin and make a symlink from sbin to bin (ln -s sbin bin).
    iv) inside usr/ create symlinks for lib, bin and sbin to the root directory (ln -s bin ../bin; ln -s sbin ../sbin; ln -s lib ../lib)
  • create the squash filesystem image (excluding the kernel modules because the kernel of BerryBoot is used)
    mksquashfs your_mountpoint archlinux.img -comp lzo -e lib/modules
  • copy archlinux.img to an usb stick, plug this usb stick into the usb port of the raspberry pi running berryboot “edit boot”
    and copy archlinux.img to the sd card (using a long mouse click on “Add OS”)
  • set archlinux as default boot entry and exit the boot menu configuration
  • the raspberry pi should boot to the arch linux boot prompt (alarmpi: user: root; password: root)

Configure PirateBox with edimax ew-7811un wifi as access point (reference)

  • replace /usr/bin/hostapd by this version (reference)
  • use editor nano and change the line driver=… in /opt/piratebox/conf/hostapd.conf
    driver=rtl871xdrv
  • edit /opt/piratebox/www/board/config.pl and uncomment and set
    ADMIN_PASS (=forum administrator password) and SECRET (seed for cryptography)
  • workaround: piratebox.service (version 2014-10-10) needs to be started with a delay (else it fails to start hostapd):
    use nano and create /etc/systemd/system/piratebox.timer:
    [Unit]
    Description=piratebox delayed start
    [Timer]
    OnBootSec=1min
    Unit=piratebox.service
    [Install]
    WantedBy=multi-user.target
  • activate this timer with
    systemctl enable piratebox.timer
  • test if piratebox runs with
    systemctl piratebox status
    and try to rerun it with
    systemctl piratebox stop
    systemctl piratebox start
    systemctl piratebox status
  • connect to piratebox access point; reboot; wait about 2 minutes; try again to connect
  • use passwd to set your own root password
  • reboot without wired lan connection and without keyboard, mouse and monitor

For a clean shutdown without keyboard ssh could be used (use hostname piratebox.lan)

To upload files from ios other than photos and videos from photo roll and camera:

  • install icab-mobile (has an affordable price)
  • on the settings page of icab-mobile set Network/Upload to icab mobile mode (defaults to ios mode)
  • even with this setting the iframed upload page uses ios upload mode, but
    http://piratebox.lan:8080
    opened as a separate page (and not as iframe) allows to upload files (which have been previously downloaded by icab-mobile)
  • documents displayed in safari can be transferred to icab-mobile download folder using “open with …” / icab mobile;
    then icab mobile asks if the document should be downloaded.

Raspberry Pi works as airplay receiver using xbmc (only for non copyrighted content)

More or less working (tested on iOS 7.1):

– builtin youtube video app for some content
– fileapp 4 (by fileapp.com) media player (mp4 videos have to be stored with extension m4v; uses builtin iOS player)
– app has to be closed to make freshly uploaded folder content visible (iTunes upload for this app)
– viewing of photos
(videos have a significant time lag between image and sound – but xbmc-kodi is still in alpha status: 2014-10-14)

Not working:
– videos taken by camera of iPhone 5s.
– copyright protected videos (e.g. any iTunes purchase)


Encoders
– handbrake: apple tv1 (format mp4, saved with extension m4v)
– adobe premiere elements 11: iPad high quality
plug player (if content gets played it can be transmitted to airplay)


Only sound:

oplayer (outputs only sound to airplay; maybe always sets bit for copyrighted videos)
builtin video app playing videos synchronized by iTunes

xbmc: raspbmc with kodi built from  here
(kodi-14-20141014-nc4.tar.gz)

To tweak audio settings use this reference

To setup raspbmc as wifi accesspoint refer to this post

Install iPhone app xmbc (official app made by the makers of xbmc)
(sometimes it is useful to connect  an iOS ssh client; currently (build20141012) required to make a clean shutdown:
login as user pi (default password raspberry) run sudo poweroff)

Alternative: rPlay by vmlite.com
(feature rich; needs free beta license; 12 months no change)


Adding a web frontend (LAMP server) to a local windows application with mssql database (Windows 2008R2 server with mssql 2008). ms access 2003 installed on windows 2008 server is used to synchronize data from mssql to mysql.

  1. mssql database -> ms access 2003 (passthrough query using odbc)
  2. ms access -> mysql (passthrough query using odbc with mysql tunneled by ssh)
  3. windows task scheduler runs ms access (vba code to run queries)

Other software which has to be installed:

  • MySQL Connector/ODBC 5.1 (32 bit)
  • plink.exe, putty.exe (PuTTY)

Configure odbc:

ms access 2003 (usually) is a 32 bit application, stored in program files (x86), so 32 bit odbc connectors have to be used (reference).
To setup 32 bit odbc dsn files open %windir%\SysWOW64\odbcad32.exe (on 64 bit windows searching for odbc opens 64 bit odbc).

  • Create a file dsn for mssql
  • Run PuTTY, connect to the mysql server host with port forwarding: local 3306 to 127.0.0.1:3306 on mysql server.
    Then create a file dsn for mysql: tcp/ip 127.0.0.1, port 3306
  • Run ms access and create linked tables with create table wizard: linked table / file type odbc / open file dsn.
    Select source table(s) in mssql and destination tables in mysql (activate save password option).
  • Tools / database tools / linked tables manager has to be run if the layout of a linked table has been changed on the server.

Passthrough queries in ms access:

  • Create a new query, do not add tables into the query, switch to SQL mode and set the type of the query to SQL / Pass-Through
  • Open the properties window and set ODBC-Connection to
    ODBC;Description=…;DRIVER=…;SERVER=…;UID=…;PWD=…;DATABASE=…
    and additionally for mysql
    PORT=3306;CHARSET=utf8;DFLT_BIGINT_BIND_STR=1
    (The field values, except PWD (password), can be found, if the odbc file dsn is opened with a text editor)
  • To run passthrough queries automatically the odbc password has to be stored in clear text(!);
    so both database servers, mssql and mysql, should have a user and password only used for odbc.
  • To test the SQL code for passthrough queries the statements should be run on the server:
    mssql with SQL Server Management Studio and mysql with PHPMyAdmin

Transfer of data from mssql to mysql: tblSrc to tblDest

  • on mysql server create tblDest_tmp with same layout as tblDest and create a linked table tblDest_tmp in ms access
  • in ms access setup a mysql passthrough query with name step1 and SQL code
    TRUNCATE TABLE tblDest_tmp
    (set property return records to false)
  • setup a mssql passthrough query with name qrySrc_mssql and SQL code which converts the data of tblSrc to the layout of tblDest, e.g.
    SELECT tblSrc.phonenumber AS phone FROM yourdb.dbo.tblSrc
  • setup a ms access append query with name step2 which uses source “table” qrySrc_mssql and destination table tblDest_tmp, e.g.
    INSERT INTO tblDest_tmp (phone) SELECT phone FROM qrySrc_mssql;
    (it is possible to choose fields in ms access design view mode)
  • setup a mysql passthrough query with name step3 which uses tblDest_tmp to update tblDest, e.g.
    INSERT INTO tblDest (phone) SELECT t.phone FROM tablDest_tmp AS t
    ON DUPLICATE KEY
    UPDATE phone=t.phone
    (set property return records to false)
  • to transfer data start ssh port forwarding and run the queries
    step1 (which removes all data from tblDest_tmp)
    step2 (which copies data from qrySrc_mssql (fetching data from tblSRc) to tblDest_tmp)
    step3 (which updates tblDest with data from tblDest_tmp)
    stop ssh port forwarding
    (bug: if port forwarding has been stopped, ms access has to be closed and reopened;
    else the queries fail with an odbc error (mysql); some reinitialization of odbc seems to be needed.)

Preparations to run the queries automatically by VBA:

  • Simple preliminary setup: create a form and use the create button wizard to put 3 buttons on the form
    which run the queries step1, step2, step3.
  • Two other buttons can be created which start and stop ssh port forwarding:
    with the create button wizard choose run application and choose as command line
    “your_path\plink.exe” -L 3306:127.0.0.1:3306 -i “your_path2\keyfile.ppk” -ssh -2 -l your_user -N your_server.com
    and (assuming a non administrative user is logged in and only one instance of plink.exe runs in the account of this user)
    taskkill /f /im plink.exe
    With PuTTYgen an openssh public key can be converted into ppk format used by plink.exe.
    To be able to run these commands by windows task scheduler all network drive mappings have to be replaced by unc names
    (e.g. \\yourbox\tools\plink.exe, not N:\tools\plink.exe)

Using VBA code to run queries:

  • to make it easier to maintain the SQL code of the queries, VBA makes temporary copies of existing queries
    (vba code based on inspiring work of mdlueck)
    Sub deleteQDF(name)
    On Error Resume Next
    CurrentDB.QueryDefs.Delete(name)
    End Sub
  • passthrough query: (step1 and step3)
    Dim daoDB As DAO.Database
    Dim daoQDFbe As DAO.QueryDef
    Dim strQryNameBe As String
    strQryNameBe=”yourTmpQuery”
    deleteQDF(strQryNameBe)
    Set daoDB=CurrentDb()
    Set  daoQDFbe=daoDB.CreateQueryDef(strQryNameBe)
    With daoQDFbe
    .Connect=daoDB.QueryDefs(“yourExistingQuery(replace by step1 or step3)”).Connect
    .SQL=daoDB.QueryDefs(“yourExistingQuery(replace by step1 or step3)”).SQL
    .ReturnRecords=False
    .Execute dbFailOnError
    .Close
    End With
    deleteQDF(strQryNameBe)
    Set daoDB=Nothing
    Set daoQDFbe=Nothing
  • append query (step2; with passthrough query qrySrc_mssql as source):
    Dim daoDB As DAO.Database
    Dim daoQDFbe As DAO.QueryDef
    Dim strQryNameBe As String
    Dim daoQDFfe As DAO.QueryDef
    Dim strQryNameFe As String
    strQryNameBe=”yourTmpQuery”
    strQryNameFe=”yourTmpQuery2″
    deleteQDF(strQueryBe)
    deleteQDF(strQryNameFe)
    Set daoDB=CurrentDb()
    Set  daoQDFbe=daoDB.CreateQueryDef(strQryNameBe)
    With daoQDFbe
    .Connect=daoDB.QueryDefs(“qrySrc_mssql“).Connect
    .SQL=daoDB.QueryDefs(“qrySrc_mssql“).SQL
    .ReturnRecords=False
    .Close
    End With
    Set  daoQDFfe=daoDB.CreateQueryDef(strQryNamefe)
    With daoQDFfe
    .SQL=daoDB.QueryDefs(“step2“).SQL
    .Execute dbFailOnError
    .Close
    End With
    deleteQDF(strQryNameBe)
    deleteQDF(strQryNameFe)
    Set daoDB=Nothing
    Set daoQDFbe=Nothing
    Set daoQDFfe=Nothing
  • run application (start plink.exe for ssh port forwarding; run taskkill to terminate plink.exe; use Chr(34) to insert double quotes into commandline):
    Dim strAppName as String
    Dim qq
    qq=Chr(34)
    strAppName= qq & “path1\plink.exe” & qq & ” -L 3306:127.0.0.1:3306 -i ” & qq & “path2\key.ppk” & qq & ”  -ssh -2 -l dbUser -N dbserver.com”
    Call Shell(strAppName, 1)

    strAppName=”taskkill.exe /f /im plink.exe”
    Call Shell(strAppName,1)

Autostart version of ms access database mdb file:

  • Evaluate command line argument:
    open mdb database with:
    “yourPathToMsOffice\msaccess.exe” “yourPathToMdbFile\yourDb.mdb” /cmd autostart
  • Create a macro with name AutoExec by new macro wizard of ms access, choose macro type run code and write to field function name:
    AutoExec(“autostart”)
    and create a VBA function with VBA-Editor (inside a standard module of VBA editor; not inside a form_module)
    Function AutoExec(ByVal strCmd As String) As Boolean
    If strCmd=Command Then
    ‘ autostart VBA code

    DoCmd.Quit
    End If
    AutoExec=True
    End Function
  • The code inside the if condition of the VBA function Autostart(strCmd) gets only executed
    if the command line of ms access.exe ends with /cmd autostart. (DoCmd.Quit closes the ms access application.)
    Else the macro AutoExec calls the VBA function AutoExec(strCmd) and returns immediately.

Use Windows Task Manager to run the queries:

  • For security reasons a normal non administrative user account should be used to autorun the queries.
    This user needs the privilege to login as batch user (reference):
    Start / Administrative tools / Local Security Policy
    Security Settings / Local Policies / User Rights Assignment / Log on as a batch job
    click right mouse button and choose Properties
    Click Add user or Group to give the privilege to the user.
  • Batch user login does not map network drives. Use UNC names instead:
    replace N:\yourSharedFolder by \\yourServer\yourShare\yourSharedFolder
    (e.g. ssh port forwarding: path of plink.exe and path of ppk file in VBA code)
  • Batch tasks do not display any window. So code run by task manager has to be checked on the desktop.
    Single stepping through VBA code inside VBA editor is recommended.
    Batch tasks are only shown in task manager if show all users is active.
  • Open Windows task manager with administrative privileges, else new tasks cannot be created.
    Use right mouse click run now to immediately try out a scheduled task.
  • Create a new task (not simple task):
    – define user to run the task
    – run independently of user login (=run with batch login) and store password
    – run with high priority
    – trigger by timer, e.g. daily
    – action: run program:
    “C:\Program Files (x86)\Microsoft Office\OFFICE11\MSACCESS.EXE”
    use arguments
    “yourPath\yourDatabase.mdb” /cmd autostart
    working directory can be left blank
    – properties: stop after 1 hour and force exit

Watch how local windows application data automagically displays in web frontend.

Hardware: Acer Aspire One D270 with Atom N2600, 2GB RAM, 1TB harddisk, only bios boot mode

Software:

  • Ubuntu 14.4 64bit: runs out of the box (has been installed after the installation of windows)
  • Windows 8.1 pro 64bit: only partly supported (video runs only with generic vga driver)

Installation notes: Windows:

  • Update bios for model AOD270 (a freedos usb stick may be used to run the dos bios installer: boot with option 3 ‘xms’)
  • Clean install of Windows 8.1 with a Windows 8 update product key:
    – needs dvd iso of Windows 8.1
    – iso to usb: use windows diskpart to create a primary ntfs formatted partition on the usb stick (compare with this post)
    and copy iso to usb with Windows 7 usb/dvd download tool; run bootsect.exe /nt60 X: /mbr  to make the stick bios bootable
    – run install with generic windows 8.1 key : XHQ8N-C3MCJ-RQXB6-WCHYG-C9WKB (installation only; cannot be updated)
    – after installation activate windows and enter your personal key; (might show error message (wrong key)  but updates anyway);
    windows 8 update keys are valid for windows 8.1.
  • Install updates (2014-05): KB2919355 does not install if Ubuntu has been installed. Workaround:
    – Run ubuntu and save first sectors of disk: fdisk -l /dev/sda displays in my case that sda1 beginns at sector 2048
    dd if=/dev/sda bs=512 count=2048 of=sectors_sda.bin (this saves bootloader grub)
    – Boot from Windows 8.1 install media, choose repair, extended, command line and run
    bootrec /fixmbr
    bootrec /rebuildbcd
    – now update kb2919355 should install (with disabled windows defender the update runs faster); then install all pending updates
    – boot from ubuntu install media, save windows mbr with dd and restore bootloader grub with dd (any error here might destroy all harddisk data!)
  • Install drivers: intel inf-drivers for chipset, realtek pci-express card reader, synaptics touchpad (see this reference)
  • after installation of ubuntu 14.4 the system has dual boot with grub2. But booting with grub2 into windows 8.1 breaks hibernate and shutdown from windows. So the boot menu of Windows 8.1 has to be used (as described here):
    – boot into Ubuntu and run dpkg-reconfigure grub-pc (reference 1, reference 2)
    (this allows to change location of grub boot code from sda to sdaN (=linux partition)
    – use dd to save the bootsector of sdaN (dd if=/dev/sdaN bs=512 count=1 of=sdaN.bin) and copy file sdaN.bin to a device
    which can be accessed from Windows
    – boot into Windows and copy sdaN.bin to the root of drive C:
    – now use bcdedit from admin console to create the Windows boot menu ({I} is a shortcut of the id returned by bcdedit /create)
    bcdedit /create /d “Ubuntu 14.04” /application BOOTSECTOR
    bcdedit /set {I} device partition=c:
    bcdedit /set {I} path \sdaN.bin
    bcdedit /displayorder {I} /addlast
    bcdedit /timeout 10
    bcdedit /default {I} (if Ubuntu should be the default boot menu entry)

Installation notes: Ubuntu 14.4

  • internet access by iPhone tethering:
    – by usb cable: install ipheth-utils
    – by bluetooth: install blueman and use usb bluetooth dongle (only some aspire one d270 models have builtin bluetooth).
    Pairing works with builtin bluetooth apple of ubuntu 14.4; connecting to network (pan) works only with blueman.

Skolelinux installation with workstations instead of thin clients. Hardware equipped with intel celeron 1007u (2×1.5 ghz) gives better performance if used as workstation and not as thin client. Below are some notes describing this setup.

Because these workstations replace a thin client setup, the workstations are placed in 192.168.x.0 subnets (x=0, 1, 2) and ip forwarding is enabled on tjener (/etc/sysctl.conf); tjener is installed without ltspserver packets. On the gateway (10.0.0.1) a static route has to be set (route add -net 192.168.0.0 netmask 255.255.252.0 gw 10.0.2.2; e.g. for ipfire in /etc/sysconfig/rc.local). On tjener every 192.168.x.0 network needs its own statically configured NIC (/etc/network/interfaces). And the dhcp server has to listen on all interfaces (/etc/default/isc-dhcp-server).

To add subnet02.intern ldap has to be edited with phpldapadmin:
systems / servers / tjener: zoneName=subnet0x.intern (x=0, 1, 2); inside this ldap entry there are further zoneName entries which have to be edited as well.
(bug: default config uses a trailing dot here which should be removed to make equal to zoneName intern;
with trailing dot the nis netgroup triple with fqdn name gets a trailing dot when added by GOsa
and command innetgr -f myhost.subnet00.intern fails. )
and
systems / servers / tjener / dhcp: cn=subnet0x.intern (x=0, 1, 2)

/etc/bind/named.conf.ldap2zone:
replace existing zone “subnet00.intern.” by “subnet00.intern” (without trailing dot, same for zone file name)
add subnet01.intern and subnet02.intern

/usr/sbin/ldap2bind (runs automatically every hour)
/etc/init.d/bind9 restart (maybe not required)
/etc/init.d/isc-dhcp-server restart

To add a workstation to tjener use GOsa, set name, ip-address and mac-address, enable dhcp, add tjener as time server
and enable dns (using the zone which matches the ip-address) and add the workstation to nis netgroup workstation-hosts.

Enable auto update on workstations: /etc/apt/apt.conf.d/50unattended-upgrades:
uncomment MinimalSteps and InstallOnShutdown

Install plymouth on the workstation to get a nice splash animation:
apt-get install plymouth plymouth-drm plymouth-x11 plymouth-themes-all
edit /etc/initramfs-tools/modules (intel_agp drm i915 modeset=1)
edit /etc/default/grub: GRUB_GFXMODE=1280×1024 and GRUB_CMDLINE_LINUX_DEFAULT=”quiet splash”
copy a background png image to /boot/grub, unpack AzenisSkole.tar.gz (based on AzenisBuntu) inside
/usr/share/plymouth/themes/ and then run
update-grub2 and select a theme with
plymouth-set-default-theme –list; plymouth-set-default-theme AzenisSkole
preview the theme with
plymouthd;  plymouth –show-splash; sleep 15; plymouth quit
and put the theme to initramfs with
update-initramfs -u

Use grub.pxe to boot from network. This allows to keep pxe boot always on for the workstations which makes it easier to use clonezilla server.
The pxe boatloader grub.pxe can be created with grub-mkimage (details, embedded config and binary grub.pxe). In GOsa
systems / tjener / services / dhcp /subnet0x.intern (x=0, 1, 2): Bootup Filename: has to be changed (from default pxelinux.0) to
“/var/lib/tftpboot/ltsp/i386/grub.pxe” and grub.pxe has to be copied to this directory.
(This setting gets active after clicking on Save / Save / Apply and running /etc/init.d/isc-dhcp-server restart)

Bugfix: sometimes freshly booted workstation do not allow login. What seems to help is:
/etc/rc.local: /etc/init.d/nscd restart

Configure workstations for classroom use: chmod -R o-rwx  ()and smae for /skole/tjener/home0) to get private home directories
and add to /etc/skel: ./kde/share/config/dolphinrc:
[General]
ShowSelectionToggle=false
and add to /etc/skel: ./kde/share/config/kwalletrc:
[Wallet]
Enabled=false

Install apache-openoffice because libreoffice coming with debian wheezy is outdated and buggy (crashes). Install google chrome to get its builtin flash and pdf support.

If tjener runs in xen /etc/fstab needs the option nobarrier. (This avoids I/O errors in domU.)

Clonezilla server (DRBL): Install minimal system of debian-edu and drbl. Then run drblsrv -i (no drbl or system install images; clonezilla box mode). Save and restore with drbl-ocs -j2 -q2 startdisk save; drbl-ocs stop; drbl-ocs -j2 startdisk multicast_restore; restore with -icds if the target disk is smaller than the source disk and if the source partitions fit on the target disk. – To “plug”/”unplug” network cables of xen vm machines use brctl addif/delif for vif-interfaces (displayed by xm network-list domU_name).

Administration of windows workstations: add existing admin user with GOsa /groups to domain-admins group. On tjener use commands
net -S 10.0.2.2 rpc group …; net -S 10.0.2.2 rpc user …
to display groups and users (as described here). Use smbpasswd to set samba password for user root. Samba user Administrator can be enabled with
smbpasswd -e Administrator.

Update to debian jessie and ipfire 2.19-110

Tjener: update as described on skolelinux.org. Workstation: new install from usb with debian-edu1 image as “workstation” (guided harddisk setup, whole disk, maybe use console to mkfs.ext4 because automatic formatting might error out when previous filesystem exists, bootloader to /dev/sda); manually instal: apt-get install myspell-de-ch); after cloning with drbl: adjust hostname using mcedit /etc/hostname. (step by step: drbl-ocs -j2 -sc0 –clients-to-wait 5 startdisk multicast_res; ssh 10.1.0.[1 or 2 … 6]; then on client mount /dev/sda1 /mnt; mcedit /mnt/etc/hostname; poweroff) – Updated ipfire: static route on ipfire to 192.168.x.0 subnets does not work; instead use nat on tjener:
iptables -t nat -A POSTROUTING -j MASQUERADE -s 192.168.0.0/24
iptables -t nat -A POSTROUTING -j MASQUERADE -s 192.168.1.0/24
iptables -t nat -A POSTROUTING -j MASQUERADE -s 192.168.2.0/24


The raspberry pi (rpi) is perfect to drive home built hardware. The lego mindstorms ev3 set with its LabVIEW based software is perfect to create simple controlling programs. And this software allows to send and receive messages by bluetooth. This lead to the idea to attach a bluetooth dongle to the raspberry pi and to add some software to receive and send ev3 bluetooth messages.

Reference 1 is the LEGO® MINDSTORMS® EV3 Communication Developer Kit mentioned in this blog post (download second (smaller) file). Reference 2 is a C# project for bluetooth communication from windows pc to ev3 brick. Reference 3 is a python script to receive ev3 bluetooth messages on the raspberry pi. Reference 4 is a blog post giving a summary of the format of the ev3 bluetooth messages (which is also found in pdf of reference 1 on page 21; comment in capitals is result from sniffing; official documentation is not correct here):
bb bb mm mm tt ss ll aa aa … LL LL pp pp … with

bb bb = bytes in the message (excluding the two size bytes), little endian (2 bytes long)
mm mm = message counter
tt = 0×81 (type of message: reply not required)
ss = 0x9E (system command: write to mailbox)
ll = mailbox name length INCLUDING the \0 terminator
aa aa … = mailbox name, should be terminated with a \0
LL LL = payload length INCLUDING the , little endian
pp pp … = payload: either logical: 1 byte; or number: 4 byte, single precision float; or text: should be terminated with the \0

This tutorial shows how to manually pair bluetooth devices using the linux command line (some additional details can be found here). On the ev3 brick side the labVIEW based software has ‘bricks’ to switch bluetooth on or off and to create or delete a bluetooth connection to a named device; create and delete should not be used! See below. (If your pi has hostname mypi then it’s default bluetooth name is mypi-0). To pair use first the menu on the ev3 brick: Turn bluetooth on; (no need to turn the iPhone/iPad variant of bluetooth on); set bluetooth to visible. Then run on the raspberry pi:

bluetooth-agent 1234 &; hcitool scan; rfcomm connect hci0 aa:bb:cc:dd:ee:ff (using address displayed by hcitool scan).

The rfcomm connect command should trigger a pairing key popup on the ev3 brick display, where the number given to bluetooth-agent has to be entered. (Key 1234 should be used because time to enter the key is limited and 1234 is the default key in the ev3 brick menu.) After successful pairing visibility can be switched off again.

On the rpi /var/lib/bluetooth/…./ contains the settings for the bluetooth dongle. File config defines the bluetooth device name.

For a simple test run the program shown below on the ev3 brick and use receive.py on rpi.
(hostname of my rpi is rpico; so bluetooth-name is rpico-0; Hello … is the message and EV3Test is the ‘mailbox name’). First activate bluetooth on ev3. Then (re)start bluetooth on rpi (/etc/init.d/bluetooth restart). Now run:

receive.py  -a aa:bb:cc:dd:ee:ff test1.bin (receive.py can be edited to set the bluetooth address of the ev3 brick as default)

 Then start the program on the ev3 brick.

This writes the message to test1.bin; (use mc to view the file):

To send the message test1.bin back to the ev3 brick: first run the program shown below; on rpi then run send.py:

send.py  -a aa:bb:cc:dd:ee:ff test1.bin (send.py can be edited to set the bluetooth address of the ev3 brick as default)

This displays Hello world! on the screen of the ev3 brick.

Important: Bluetooth only works if connections are always initiated from rpi and never from ev3 (brick or software: do not use the bluetooth ‘software brick’ of the ev3 software to connect or disconnect!) This is the result of current testing (firmware 1.03H or unofficial firmware 1.04H with support for edimax ew-7811un wifi dongle). – Initiating the connection from ev3 brick seems to change something in the bluetooth configuration of the ev3 brick which causes errors. A  possibility to get rid of these errors is to delete the directories /var/lib/bluetooth/AA:BB:CC:DD:EE:FF on both devices. (Either needs shell access to ev3 brick; possible with wifi adapter and telnet: user root with empty password. Or use the ev3 software on your  computer, open the memory browser of ev3 brick and download reset_bluetooth.rbf (source: reset_bluetooth.lms)  to ev3 brick and use the ev3 brick menu to run reset_bluetooth.rbf) Then reboot the ev3 brick, restart bluetooth on rpi and do again the pairing process described above. Afterwards reboot the ev3 brick again.

Instead of sending messages to the ev3 brick it is possible to use send.py to send commands (as described in reference 1 mentioned above).

send.py led9.bin; sleep 20; send.py led0.bin (the ledN.bin files, N=0,1,2…9, can be found here)

As documented here the LED on the ev3 brick is controlled by a byte pattern. For instance the file led9.bin containing the hex values
08 00 00 00 80 00 00 82 1B 09
makes the LED pulse orange and led0.bin (with 0 instead of 9 as last byte) switches the LED off; (byte code reference 1: search for LED 2 : search for opUI_WRITE, 3: page 96 of firmware development pdf).

It is even possible to transfer command sequences of byte codes with send.py. First the program has to be written in “ev3 byte code assembler language” (helloworld.lms). This has to be compiled (helloworld.rbf). Second the trailing 0x0A byte has to be removed and the header (28 bytes) has to be replaced (nn NN 00 00 80 00 00; nn = lower byte and NN = higher byte of  L-2; L = size of file): helloworld.bin. A good reference for the first step is here. All files required to create the example program hello world are here (sources 1, 2, byte codes.h). The second program in this archive which allows to run a linux program from sd card has its origin here. Examples for the second step are on pages 26-31 of the LEGO® MINDSTORMS® EV3 Communication Developer Kit (mentioned in this blog post;download second (smaller) file)

Raspbian (current version, 2014-03) on raspberry pi comes preinstalled with oracle jdk. Using a lightweight replacement for Eclipse
java programs for lego mindstorm ev3 with lejos firmware can  be developed on the raspberry pi.

This tutorial was used to get started. More about IDE Geany can be found on www.geany.org.

apt-get install geany

apt-get install ant

apt-get install libjsch-java

cd /usr/share/ant

ln -s /usr/share/java/jsch-0.1.42.jar jsch.jar


assuming ev3 classes are installed with eclipse as described in lejos.org wiki:

On raspberry pi create a subdirectory ev3 in your geany projects folder (e.g. /home/pi/Projekte/ev3 in german localized version of geany)

cd into this directory and use scp to copy DBusJava and ev3classes from eclipse ev3 folder on your computer with eclipse:

scp -r your_ip_address:/your_eclipse_ev3/folder/DBusJava .
scp -r your_ip_address:/your_eclipse_ev3/folder/ev3classes .

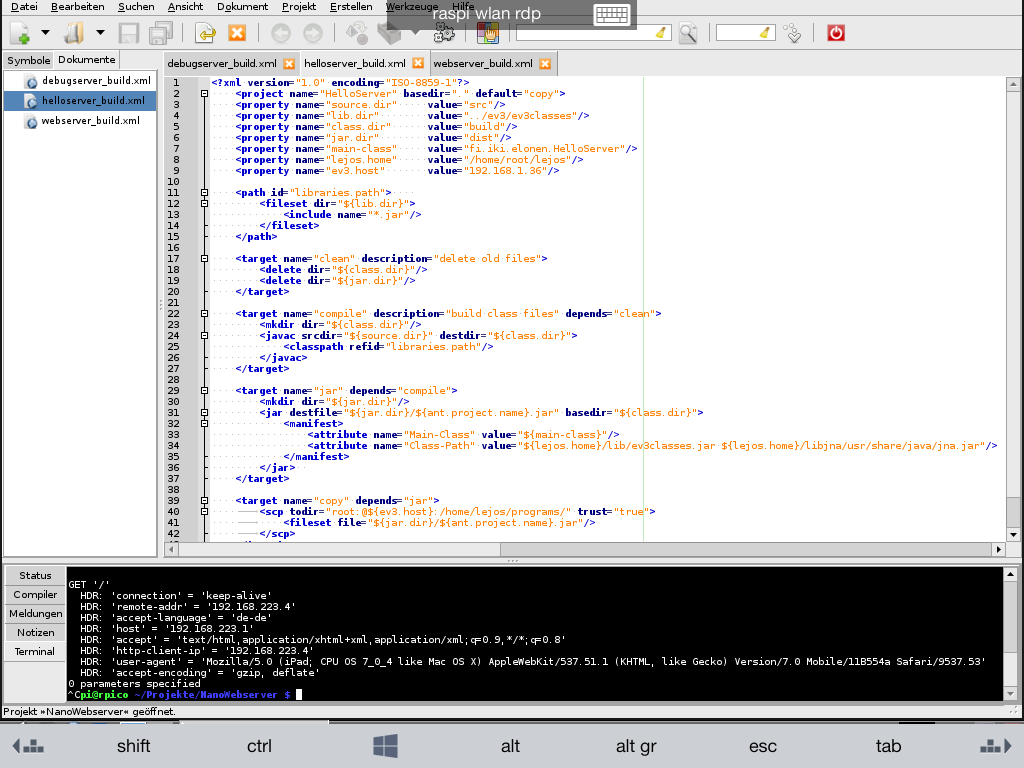
Open geany and create a new project ev3. Open the file ev3/DBusJava/build.xml. Then open the Terminal tab at the bottom of the geany window.
Use cd to change into your projects folder; then cd into ev3/DBusJava
Run ant jar
If the command did complete successfully use cd to change into ev3classes directory and open the file ev3/ev3classes/build.xml from geany menu.
Run ant jar
Use scp to copy some example project from eclipse to geany. Create a new geany project with the same name.
Use command ant jar in geany Terminal to compile the project. Finally use ant copy to transfer the jar archive to raspberry pi.

Result on iPad with bluetooth keyboard (using the steps described here):

Mathematica comes preinstalled on raspbian and is free for personal use. Adding a vnc or rdp server to a raspberry pi running raspbian allows to display and control Mathematica with an iPad. If the raspberry pi is configured as wlan access point you get a free and rather mobile installation of Mathematica.

Required hardware: raspberry pi model B, 16 GB sd(hc) card (at least 4 GB), ew-7811un wireless usb adapter; device running a vnc or rdp  viewer (e.g. iPad with RD Client app).

  1. Installation of raspbian to sd card:
    download raspbian image http://downloads.raspberrypi.org/raspbian_latest
    unzip the file
    copy it to the sd card (linux: dd if=your_file of=/dev/sdX bs=1M; sdX is the device name of the sd card)
  2. Configuration of raspbian on raspberry pi:
    for the first run plug monitor, keyboard, lan and usb current source into raspberry pi;
    raspi-config gets started automatically on first boot
    resize raspbian partition to full size of sd card (using the menu of raspi-config)
    set hostname, keyboard, language, timezone, password; enable ssh server; boot into console
    login as user pi and become root with sudo su. Run apt-get update and then apt-get upgrade
  3. Add software to raspbian (as root user)
    apt-get install mc (I cannot live without)
    apt-get install xrdp
    apt-get install tightvnc-server
    apt-get install hostapd dnsmasq
  4.  The xrdp server works with the default configuration. Alternatively use tightvnc-server as described here:
    with  VNC_USER=”pi”, HOME=”/home/pi”,FOO_ID=1
    and set as user pi a password for vnc with vncpasswd;
    after reboot the vnc server will listen on port 5901
  5. Configure the wlan router function as described here, but make the following changes:
    the program /usr/bin/hostapd installed by raspian has to be replaced by  a self compiled version (mine is here – having used these instructions); (or you might use this file mentioned in this note)
    add dns server 8.8.8.8 to /etc/dnsmasq.conf: dhcp-option=6,8.8.8.8
    (ios clients seem to be picky about non standard network masks. So configure wlan0 with 255.0.0.0 and adapt dnsmasq.conf.
    dhcp-range=interface:wlan0,10.0.0.2,10.0.0.20,10.254.254.20,255.0.0.0,infinite)
    add modules to /etc/modules (one per line):
    nf-conntrack-ipv4 iptable-nat ipt-MASQUERADE (optional iptable-filter )
    do not create the file /etc/network/ifup.d/router.sh, but add the 2 lines of this file to /etc/rc.local
    ifup wlan0
    iptables –table nat -A POSTROUTING –out-interface eth0 -j MASQUERADE
    #optional: iptables -A FORWARD –in-interface wlan0 -j ACCEPT
    #optional: iptables -I INPUT -i wlan0 -p udp –dport 67:68 –sport 67:68 -j ACCEPT
    (and make sure that the newly added lines are above the line “exit 0”)
    Remark: long iptables options have — which tends to get displayed as unicode long hyphen; (has to be replaced manually when using copy and paste):
    To test hostapd and/or dnsmasq run it on the console: hostapd /etc/hostapd/hostapd.conf
    and/or dnsmasq -u dnsmasq –conf-file=/etc/dnsmasq.conf -d
  6. Plug the mini wlan adapter ew-7811un into the raspberry pi and reboot
    try to join wlan Himmbeerhacks and try to connect with rdp to 10.0.0.1 or open 10.0.0.1:5901 with a vnc viewer (like  RD Client or Remoter VNC on iPad).

Further trial and error shows that with a bluetooth keyboard rdp works better than vnc. Especially square brackets (alt+5, alt+6) do not work well with vnc – at least in my setup with locale swiss german. That is why I started to use xrdp and the free microsoft remote desktop client for iOS.

Installation notes:

DebianEdu wheezy uses 10.0.0.0/8 with gateway 10.0.0.1
(e.g. spblinux with ifconfig eth1 10.0.0.1; cfg_nat start;
in vbox eth0 bridged, eth1 internal connected to tjener)

Installation of ltsp-server:

  • only non automatic partitioning (using guided partitioning) works (21.8.13)

phpldapadmin (https://10.0.2.2/phpldapadmin/)

  • apt-get install phpldapadmin
  • changes in /etc/phpldapadmin/config.php
    Uses tls which starts with default port 389 (not ssl, 636, ldaps):
    – $servers->setValue(‘server’,’host’,’ldap‘)
    //$servers->SetValue(‘server’,’port’,’636′)
    Login with ou=ldap-access (with password of unix system user root)
    – $servers->setValue(‘login’,’bind_id’,’cn=admin,ou=ldap-access,dc=skole,dc=skolelinux,dc=no’)

Add ltspserver in gosa (https://10.0.2.2/gosa/
(login as user which has been created during installation of tjener)

  • Systems: Action Add
    Generic:
    – Server name: ltspserver00
    – Mode activated
    – Base /
    – IP-address 10.0.2.10
    – MAC_address: 12:34:ab…
    (might be looked up by first booting ltspserver:
    and dhcp gives name auto-mac-12-34-ab…)
    – Enable DHCP true and parent node (tjener) dhcp
    – Enable DNS true and Zone TJENER/intern
    Apply.
    Services:
    – add Terminal service
    Apply and start the service.
    NIS Netgroup:
    Add group ltsp-server-hosts
    – seems to get set in ldap directory, but does not display in gosa
    (netgroup/ltsp-server-hosts/nisNetgroupTriple)
    netgroup gets used as nfs4 authentication.

Nagios (https://10.0.2.2/nagios3/):

  • Add ltspserver00 to nagios by running sitesummery-update-nagios
  • Set password for user nagiosadmin with
    htpasswd /etc/nagios3/htpasswd.users nagiosadmin
    (and apache2ctl graceful)

Thin clients:

  • when used with vbox: needs vbox extension pack


JavaFX: java-jdk + SceneBuilder + eclipse + e(fx)clipse

  • download current java 7 jdk from oracle
    (java.com / Developers / JDK download / 64 bit)
  • unpack into /usr/lib/jvm and
    ln -s jdk1.7.0_xx java-7-oracle-amd64
  • update-alternatives –install /usr/bin/java java /usr/lib/jvm/java-7-oracle-amd64/bin/java 1
  • update-alternatives –install /usr/bin/javac javac /usr/lib/jvm/java-7-oracle-amd64/bin/javac 1
  •  update-alternatives –config java (select java-7-oracle-amd64)
  • update-alternatives –config javac (select java-7-oracle-amd64)
  • download Scenebuilder (64 bit) from java.com
    (currently http://www.oracle.com/technetwork/java/javafx/downloads/devpreview-1429449.html)
    and unpack it into /opt
  • download eclipse (64bit, standard edition, tar archive) from eclipse.org
    und unpack it into /usr/lib
  • run (alt+F2) kdesu /usr/lib/eclipse/eclipse
    – Help / Install new software / Add
    Name: e(fx)clipse
    Location: http://download.eclipse.org/efxclipse/updates-nightly/site
    – select e(fx)clipse Kepler