Author Archive

If the same virtual machines should be used on a multi boot system there are at least 3 choices:

  • A fat32 partition with virtual disk files. But disk size is limited to 4GB.
  • An iSCSI disk connected by network. Speed is limited by network throughput.
  • Direct access to hard disk partitions used as virtual disks. With windows a separate hard disk has to be used.

The third choice is described below. Thus a second hard disk only used with virtual machines is required. To allow hard disks with more than 2 TB capacity the disk is partitioned as gpt disk.

Warning: the commands described below can erase the whole data of your hard disks if a mistake is made. Do not continue unless you have a full backup of your system.

========================================

(Yes I am prepared to restore my system in case of a mistake …):

Attach an additional hard disk to your computer which is only used for virtual box images (tested with internal disk; should work with usb disk).
(At least the currently running (host) operating system must not be installed on the same disk).
Add a new partition to the additional hard disk. (If the new virtual disk has 25 GB then the size of the new partion is 25 GB.) In case of a gpt partioned disk up to 128 partitions can be created.

  • with a linux host using gdisk the type of the new partition can be set to 0x8301 (linux reserved)
    (internally translated by gdisk to 8DA63339-0007-60C0-C436-083AC8230908)

In case of windows 7 as virtual machine the hardware uuid of the vm must be the same
in the three hosts (linux, osx, windows). (Else the activation of windows 7 cannot be kept.)

  •  to display the hardware uuid of the activated vm (with name W7) use:
    VBOxManage showvminfo W7 |grep Hardware
  • to set the hardware uuid of a vm (with name W7_1) use the uuid displayed by showvminfo:
    VBoxManage modifyvm W7_1 –hardwareuuid 12345678-1234-abcd-0123-0123456789ab


Using this partition as virtual hard disk with a linux host:

  • determine the device name of the new partition, e.g. /dev/sdb7
    (cat /proc/partitions, gdisk -l /dev/sdb …)
  • either ad the current user to group disk to allow raw access to all disks
    (has only to be done once; is effective after re-login; but is potentially dangerous).
    Or change the group of /dev/sdb7 to vboxusers
    (to be repeated after reboot)
  • run as root user:
    VBoxManage internalcommands createrawvmdk -rawdisk /dev/sdb7 -filename my_filename.vmdk
    and change the ownership of this file to the current user
  • run VirtualBox and add my_filename.vmdk as hard disk to the virtual machine


Using this partition as virtual hard disk with a OS X host:

  • determine the device name of the new partition, e.g. /dev/disk1s7
    (ls -l /dev/disk* …)
  • ad the current user to group operator to allow raw access to all disks
    (is effective after re-login; is potentially dangerous):
    dseditgroup -o edit -a name_of_current_user -t user operator
  • Change permission of group from read access to write access
    sudo chmod g+w /dev/disk1s7
    (to be repeated after reboot)
  • run as root user:
    VBoxManage internalcommands createrawvmdk -rawdisk /dev/disk1s7 -filename my_filename.vmdk
    and change the ownership of this file to the current user
  • run VirtualBox and add my_filename.vmdk as hard disk to the virtual machine
  • if OS X auto mounts partitions which should be used by virtualbox: try to deactivate them with disk utility; in case that does not work you can run disk arbitrator which blocks auto mount

Using this partition as virtual hard disk with a Windows 8 64 bit host:

  • requires to run VirtualBox with administrative privileges
  • determine the device name of the new partition, e.g. diskpart
    list disk
    select disk 1
    list partition
    select partition 7
    detail partition
  • windows blocks raw access to the hard disk if the disk is online; use diskpart to switch the disk offline:
    list disk
    select disk 1
    offline disk
  • if the disk is mbr partioned open a console window with administrative privileges and run:
    “C:\Program Files\Oracle\VirtualBox\VBoxManage internalcommands createrawvmdk -rawdisk \\.\PhysicalDrive1 -filename my_filename.vmdk -partitions 7
    if the disk is a gpt disk VBoxManage will crash (with VirtualBox 4.2.12) and you have to run this command using a linux host
    VBoxManage internalcommands createrawvmdk -rawdisk /dev/sdb -filename my_filename.vmdk -partitions 7
    (the resulting file my_filename.vmdk hast to be copied to the windows host)
  • use wordpad to edit the vmdk file, so that partition 7 is seen as a whole virtual disk:
    (once again a warning: an editing mistake might erase all data of your hard disks)
    change createType to “fullDevice”
    between the lines “# Extent description” and “# The disk Data Base”
    delete all lines except the one refering to partition 7 (e.g. RW 52428800 FLAT “\\.\PhysicalDrive1” 482756608)
    If the vmdk file has been created with linux then the linux device name (e.g. /dev/sdb) has to be replaced
    by the windows device name (e.g. \\.\PhysicalDrive1)
  • run VirtualBoxwith administrative privileges and add my_filename.vmdk as hard disk to the virtual machine


Harddisks with form factor 2,5 inch have capacities of 1 or 2 terabyte nowadays. And usb 3.0 connectors supply enough current to run these harddisks. If it is possible to boot from such a harddisk into the imaging program you get a very compact backup and recovery system. Useful for snapshots of installed operating systems (allowing bare metall recovery).

Example of such a system with WD my passport 2,5′ USB 3.0 harddisk and TrueImage home 2013:

– use trueimage media builder to create a bootable usb stick (1GB)
– use diskpart in windows to repartition the my passport harddisk (with mbr partition table): create 2 primary partitions, make the first 1000 MB big, make this partition active and (quick) format it with fat32. The second partition takes the rest of the harddisk.

– open trueimage (inside windows) backup the first partition of the usb stick which has been made bootable by media builder.

– restore this backup to the first partition of the my passport harddisk

– boot into linux (a live cd could be used), format the second partition of the my passport harddisk with ext3 filesystem and create a folder for backups on this partition.

– verify that file /usr/share/syslinux/mbr.bin exists. (Else install syslinux). Then check the device name of the my passport harddisk, e.g. sdb and run as root user
dd if=/usr/share/syslinux/mbr.bin of=/dev/sdb
(Make sure that sdb is the my passport disk!).
In case of a gpt disk use gptmbr.bin and set the type of the second partition to 0700 (else trueimage does not save tib-files on this partition);
(additional remark: use gdisk /dev/sdb to set the legacy BIOS bootable flag on partition 1 (inside gdisk: p   x   a   1   2   <enter>   w);
this makes the gpt disk BIOS bootable, at least syslinux works as bootloader on this partition and syslinux may load trueimage …).

– now you should have a bootable harddisk with space for backups

– tested with mac mini (6.1 = ‘late 2012’). – In case of usb reset errors it might be worth to try another usb cable; the bootable version of trueimage uses linux.

installation snippets

goal: efi-bootable installation of OS X, Windows 8, Linux (opensuse 12.3)

backup harddisk:

  • unused 16 GB usb stick
  • use os x disk utility to create a guid partition table with two partitions (first with 1 GB size, formatted mac os extended journaled)
  • download os x recovery tool from apple here
  • run the recovery tool (in os x) and format the usb stick
  • use os x disk utility to create a second partition on the usb stick
  • use this second partition as time machine backup and let time machine create a full backup (might take some hours with usb 2 sticks);
    – needs about 12 GB to backup the preinstalled os x of mac mini;
    – change energy settings in system settings that this backup does not get interrupted by automatic sleep mode.
  • make sure that the usb stick is bootable:
    boot with pressed option/alt-key

reformat hard disk as gpt disk without (protective) mbr

  • warning: a backup is required because all data on the disk will be erased
  • in order to get as second os windows with efi boot the disk is formated with windows diskpart (following this helpful tutorial)
  • boot with some windows 8 install media (windows 7 or vista should work as well)
    – press shift+F10 to get a console window
    (it might be neccessary to enter repair options screen first)
    – run diskpart with

    • list disk
    • select disk 0
    • clean
    • convert gpt
      in case convert gpt fails with error write protected
      and attr dis shows read-only yes, then run
      attr dis clear readonly
      now convert gpt should work
    • create partition efi size=256
    • format fs=fat32 quick label=EFI
    • create partition primary size=51200 [size of your OS X partition in MB; Ex. 50GB = 51200]
    • list partition
    • create partition msr size=128
    • create partition primary size=30720 (desired size of your Windows partition; Ex. 30GB = 30720)
    • format fs=ntfs quick label=Windows
    • exit

    – reboot

restore os x

  • boot with pressed option/alt-key, select the usb stick with osx recovery tool
    – restore os x using the time machine backup
  • reboot into os x
    – run boot camp to download windows drivers
    (store the drivers in your os x home folder)
    – do not use boot camp to prepare your hard disk!
    – install rEFIt 0.14 boot loader from sourceforge
    -the configuration file of rEFIt allows to set os x as default os
    (/efi/refit/refit.conf on the os x system partition
    default_selection M)

prepare efi-bootable windows 8 install medium

  • warning: in bios-mode the installer does not accept the disk and windows partition created with diskpart
    (only windows 8 64 bit properly prepared install media support (u)efi-mode )
  • steps to create a efi-bootable usb stick from only bios-bootable dvd (as described here)
    – unused 4 GB usb stick
    – run diskpart (from windows vista/7/8 or from a windows 7/8 installer)
    – run diskpart with

    • list disk
    • select disk X (make sure X corresponds to the 4 GB usb stick!)
    • clean
    • create partition primary
    • select partition 1
    • active
    • format fs=fat32 quick
    • assign
    • exit

    – copy files from existing bios-bootable windows 8 64 bit install medium to the new usb stick

    • xcopy E:\*.* /s/e/f F:\

    – this assumes the existing install medium has drive letter E: and the new medium has drive letter F:
    – reboot into os x and copy the folder with bootcamp drivers to the new usb stick

install windows 8

  • boot with the efi bootable windows 8 pro 64 bit install medium
  • select the windows partition created before
    (if the installer displays that this partion is not formatted then efi-boot failed; you have to retry to boot into efi-mode)
  • after installation of windows 8 install bootcamp drivers (enables networking)
  • to get rEFIt boot manager back
    – either boot with pressed option/alt-key into osx and use system settings to select start volume “os x”
    – or use the windows 8 bootcamp system tray applet to select the start volume “os x”

opensuse 12.3 installation

  • burn an OpenSuse 12.3 64 bit install dvd (full installer, not only network installer)
  • efi-boot with this dvd (using grubx64.efi)
  • select user defined install
  • add linux partitions to the hard disk
    – an additional fat32 data partition which has rw access by os x, windows and linux might be useful
    – the partioning summary should show that /dev/sda1 is used as boot device
  • in boot manager settings select “test for other systems”, use grub2-efi and ignore the error message
  • install linux
    – should be successful except network
  • to get rEFIt boot manager back boot into windows and use bootcamp system try applet
    (windows should be displayed in the grub2 boot menu; eles use pressed option/alt key during boot)
opensuse 12.3 enable wired network
  • the tg3 network module has to be recompiled with additional pci id lines
    (the same issue is in Desinfec’t 2013 published by german c’t magazine: patched ubuntu tg3.ko: tg3_desinfect2013)
  • boot into linux and use yast to install from dvd build tools and linux kernel source and linux headers:
    – the rightmost tab in yast software install tool (“Schemata” in german version) allows to select
    – basic development tools
    – c/c++ development
    – linux kernel development
  • the file tg3.c has to be patched as decribed here
    (lspci -nn gives [14e4:1686] which corresponds in tg3.h to TG3PCI_DEVICE_TIGON3_57766
    but the device id TG3PCI_DEVICE_TIGON3_57766 is missing in tg3.c)
    – copy /usr/src/linux/drivers/net/ethernet/broadcom/tg3.c to tg3.c.orig and add the lines marked with +
    (without writing the ‘+’ sign)

    {PCI_DEVICE(PCI_VENDOR_ID_BROADCOM, TG3PCI_DEVICE_TIGON3_57762)},
    + {PCI_DEVICE(PCI_VENDOR_ID_BROADCOM, TG3PCI_DEVICE_TIGON3_57766)},
    + {PCI_DEVICE(PCI_VENDOR_ID_BROADCOM, TG3PCI_DEVICE_TIGON3_57782)},
    + {PCI_DEVICE(PCI_VENDOR_ID_BROADCOM, TG3PCI_DEVICE_TIGON3_57786)},
    - then recompile tg3.ko; run inside a konsole window:
    cd /usr/src/linux
    make clean
    make oldconfig
    cp /usr/src/linux-obj/x86_64/desktop/Module.symvers /usr/src/linux/
    (or cp /boot/symvers-3.xyz.gz /usr/src/linux; cd /usr/src/linux; gunzip symvers-3.xyz.gz;
    ln -s symvers-3.xyz Module.symvers)
    make scripts
    make prepare
    cd drivers/net/ethernet/broadcom/
    make -C /usr/src/linux SUBDIRS=$PWD modules
    su
    cp tg3.ko /lib/modules/3.7.10-1.1-desktop/kernel/drivers/net/ethernet/broadcom/
  • finally re-insert tg3 kernel module:
    - rmmod tg3
    - insmod tg3
  • use command dmesg and ifconfig -a to verify that network interface eth0 is now available
  • use yast to setup wired network eth0

opensuse 12.3 enable wireless network

  •  kernel module b43 needs firmware files which should be downloaded by
    sudo /usr/sbin/install_bcm43xx_firmware
    (as diplayed by:
    rmmod b43
    modprobe b43
    dmesg
    )
  • currently (2013-03) install_bcm43xx_firmware does not install all required files
    (ucode29_mimo.fw is missing)
  • download these firmware files (which claim to be part of netgear wndr4500 gpl source package)
  • open this archive and extract linux/wl_apsta.o to /lib/firmware/broadcom-wl-firmwares/
  • open a konsole window with root rights and run
    cd /lib/firmware/broadcom-wl-firmwares
    b43-fwcutter -w /lib/firmware/ wl_apsta.o
  • now run:
    rmmod b43
    modprobe b43
    dmesg
    This should display Broadcom 4331 WLAN found
  • then use yast or network manager to configure wireless network
bluetooth not working: lsusb ID 05ac:828a Apple, Inc. probably solved like done for
ID 05ac:8286 Apple, Inc. (Macbook Pro): see https://lkml.org/lkml/2012/7/9/473

+++ b/drivers/bluetooth/btusb.c
@@ -84,6 +84,9 @@ static struct usb_device_id btusb_table[] = {
+ /* Apple MacBookPro10,1 */
+ { USB_DEVICE(0x05ac, 0x8286) },
+

Steps to get  dovecot 2.1.17 on qnap ts 119p II NAS (firmware 3.8.1 or 4.x) up and running:

dovecot has to be compiled from source:

  • qnap web admin: qpkg center: available / more / Optware IPKG: install and activate it. Or with newer firmware, 4.x, follow these instructions (using HDA_DATA instead of MD0_DATA and replacing cs05q3armel = gcc-3.4.4 by cs08q1armel = gcc-4.2.3).
  • enable ssh on qnap and connect as user admin
  • cd /opt
  • ./Optware.sh start. Or with newer firmware:
    PATH=/opt/bin:/opt/sbin:$PATH
  • ipkg update
  • ipkg install mc
    (my preferred editor and file manager)
  • ipkg install libidn
    ipkg install optware-devel
    (pulls in many tools used for compilation of packages)
  • mkdir src
    cd src
    wget http://www.dovecot.org/releases/2.1/dovecot-2.1.17.tar.gz
    tar -xzf dovecot-2.1.17.tar.gz
    cd dovecot-2.1.17
    (download dovecot source)
  • export PATH=/opt/bin:/opt/sbin:$PATH
    (compilation might fail if tools in /bin or /usr/bin are used instead of the ones in /opt/bin)
    ./configure –prefix=/opt –with-storages=maildir
    make
    make install
    (if configure does not find a required library foo the run ipkg list |grep foo and install libfoo-dev with ipkg install)
  • child processes of dovecot use /lib and ignore /opt/lib
    (maybe this can be avoided with CPPFLAGS=”-I/opt/include” LDFLAGS=”-L/opt/lib -ldl” ./configure …)
    qnap firmware 3.8.1 installs libssl 0.97 in /lib but ipkg installs libssl 0.98 in /opt/lib; workaround:
    ln -s /opt/lib/libssl.so.0.9.8 /lib/
    ln -s /opt/libcrypto.so.0.9.8 /lib/
    (to be moved into dovecot startup script)
  • mkdir /opt/var/log
    addgroup dovenull
    addgroup dovecot
    adduser -D -H -G dovenull dovenull
    adduser -D -H _G dovecot dovecot
  • cd /opt/etc
    mkdir dovecot
    mkdir dovecot/conf.d
    (now copy config files from /opt/share/doc/dovecot/example-config to /opt/etc/dovecot, e.g. using mc)
    dovecot.conf: protocols = imap and listen = *
    10-auth.conf: disable_plaintext_auth = no
    10-logging.conf: log_path = /opt/var/log/dovecot.log
    10-mail.conf: mail_location = maildir:/share/dovecot/%n
    10-master.conf: unchanged
    10-ssl.conf: ssl = no and #ssl_cert… and #ssl_key… (disable ssl; might be enabled in a later step)
    20-imap.conf: unchanged
    auth-system.conf.ext: comment out the section driver = pam and uncomment the section driver = shadow
    and add args = blocking=no
    newer firmware 4.x:
    do not use blocking=no because /etc/shadow needs a worker thread which is allowed to access /etc/shadow; so add to auth-system.conf.ext:
    service auth-worker {
    group = administrators
    }
    (mail users will be created with qnap web interface)
  • from qnap web interface: access control
    user-groups: create group mail
    shared folders: add folder dovecot (use automatic path and do not share it)
    shared folders: permissions for folder dovecot:
    user: create the mail user yourname with password  and add it to group mail
  • start dovecot manually
    dovecot -c /opt/etc/dovecot/dovecot.conf
    and test it with telnet as described in the dovecot wiki (with mail user yourname)
    finally try to connect with a mail client like thunderbird
  • start and stop dovecot automatically: there are optware start/stop scripts in /opt/etc/init.d
    but the qnap firmware (currently 3.8.1) does not execute them.
    – mkdir /tmp/config
    – mount /dev/mtd5 /tmp/config
    firmware 4.x: use /dev/mtdblock5
    – add executable file autorun.sh to /tmp/config:
    #!/bin/sh
    #
    for f in /tmp/config/K*.sh; do
    [ -x $f ] && $f start &
    [ -x $f ] && cp $f /etc/rcK_init.d/
    done
    – enable autorun.sh with
    /sbin/setcfg Misc Autorun TRUE
    /sbin/setcfg Misc Autorun TRUE -f /tmp/config/uLinux.conf
    (reference /etc/rcS.d/S98init_nas)
    – copy K010optstartstop.sh to /tmp/config (with extension ‘.sh’, not with extension.txt; partly found here and here)
    – chmod +x /tmp/config/K010optstartstop.sh
    – umount /tmp/config
    this will execute   start/stop scripts in /opt/etc/init.d.
  • /opt/etc/init.d/S59dovecot may contain
    #!/bin/sh
    if [ -f /opt/var/run/dovecot/master.pid ] ; then
    kill `cat /opt/var/run/dovecot/master.pid`
    else
    killall dovecot 2>/dev/null
    fi
    rm -f /opt/var/run/dovecot/master.pid
    ln -s /opt/lib/libssl.so.0.9.8 /lib/
    ln -s /opt/libcrypto.so.0.9.8 /lib/
    /opt/sbin/dovecot -c /opt/etc/dovecot/dovecot.conf
  • /opt/etc/init.d/K41dovecot may contain
    #!/bin/sh
    if [ -f /opt/var/run/dovecot/master.pid ] ; then
    kill `cat /opt/var/run/dovecot/master.pid`
    else
    killall dovecot 2>/dev/null
    fi
    rm -f /opt/var/run/dovecot/master.pid
    or simply
    #!/bin/sh
    /opt/bin/doveadm stop
  • both scripts have to be executable
    chmod +x /opt/etc/init.d/S59dovecot
    chmod +x /opt/etc/init.d/K41dovecot

To be continued with py25-getmail to collect mails from pop3 servers
(getmail delivers mails directly into the maildir folders used by dovecot)

  • ipkg install py25-getmail
  • instructions for getmail configuration (not written for qnap)

Preparing a NAS for backup with rsync I wanted to copy initial data with nfs because of higher transfer speed.

The NAS nfs export mounts fine on a linux box but not from osx 10.5.8. Some search revealed that

  • /etc/hosts on the NAS should have an entry for the osx machine [1]
    (e.g. 1.2.3.9 my_osx_box)
  • instead of mount 1.2.3.4:/share /mnt use mount_nfs -P 1.2.3.4:/share /mnt [2]
    (or add insecure to /etc/exports on the NAS)

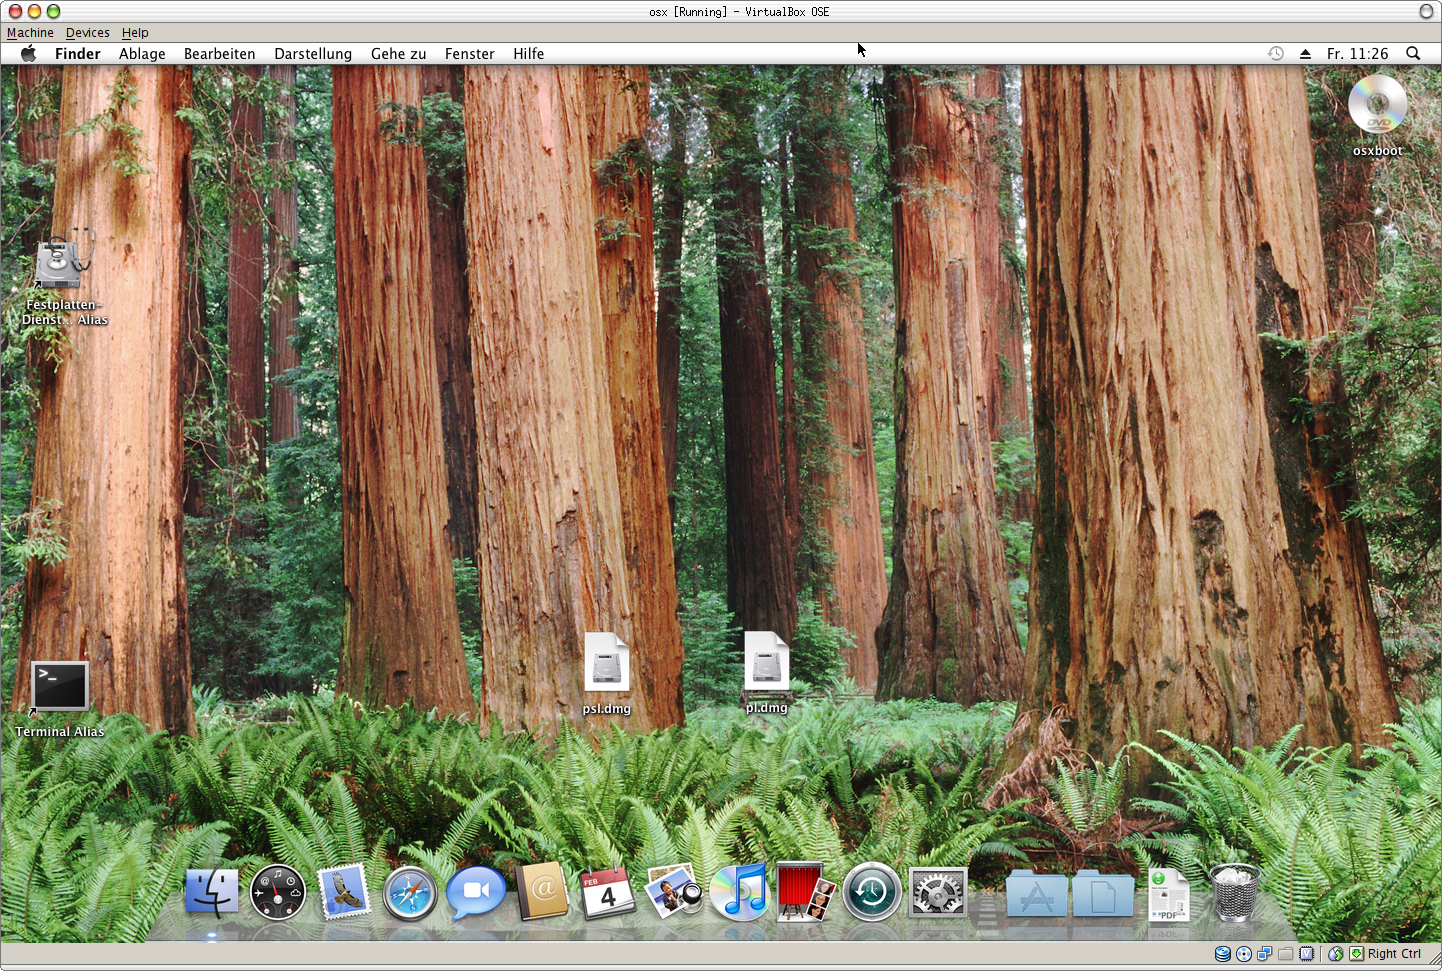
If you have a triple boot mac mini with OS X, Windows and Linux it might be useful to run OS X inside VirtualBox when Linux or Windows is running.

VirtualBox officially supports OS X Server as guest vm and runs as well other OS X versions as guest. – If Linux runs on a second (external) hard disk the first harddisk can be assigned to a virtualbox vm as raw device. And OS X should boot as guest (of type OS X server). However booting a vm with EFI instead of BIOS is still work in progress. With virtualbox 3.2.12:

  • limited screen resolutions
    (VBoxManage setextradata "VM name" VBoxInternal2/EfiGopMode N, N=0,1,2...4)
  • only first ide hard disk is bootable
  • overrides installed boot manager, e.g. rEFIt; and settings done by OS X start volume utility are completely ignored (missing virtualized hardware)
  • sometimes crashes in libata (ide disk access); maybe not related to efi boot

EFI boot can be disabled in system settings of the guest vm. But then you need a BIOS bootloader for the OS X kernel like Chameleon which seems to be a very active project.

  • chameleon could be installed to the disk containing OS X – but I prefer an unmodified disk
  • so chameleon should boot from cdrom

There are many cdrom iso images with chameleon online, but none met my needs:

  • boot leopard and snow leopard
  • boot from apple hardware but inside virtualbox
  • do not use hackintosh kext patches, except disabling native apple power management with Disabler.kext (else the guest uses 100% cpu)
  • screen resolution of guest vm be be selected in boot menu

The chameleon boot loader (2.0 RC4 r684) has lots of usage setups. But many of them are only documented by their source code.

  • the stage 2 loader of chameleon, boot, is in multiboot format
  • it can be chain loaded by syslinux mboot.c32
  • mboot.c in chameleon source reveals 3 command line arguments:
    biosdev=80 (or 81 for second hard disk, …)
    partno=2 (for second partition)
    timeout=5 (autostart after 5 seconds)
  • multi boot “kernels” may have “modules” (=initial ramdisk in case of linux kernel); chameleon uses a dmg image whith boot parameters and kext kernel modules
    – dmg format: compressed, with mbr partition, hfs+ filesystem in partition 1
    – /Extra/com.apple.Boot.plist defines boot parameters
    – /Extra/Extensions/ contains kext modules
  • isolinux.cfg example:
    kernel /mboot.c32
    append biosdev=80 timeout=1 partno=2 /boot --- /p800x600.dmg
  • com.apple.Boot.plist entry for Display resolution
    <key>Graphics Mode</key>
    <string>1280x1024x32</string>
  • com.apple.Boot.plist entry for verbose mode
    <key>Kernel Flags</key>
    <string>-v</string>
  • the dmg image can be opened inside OS X

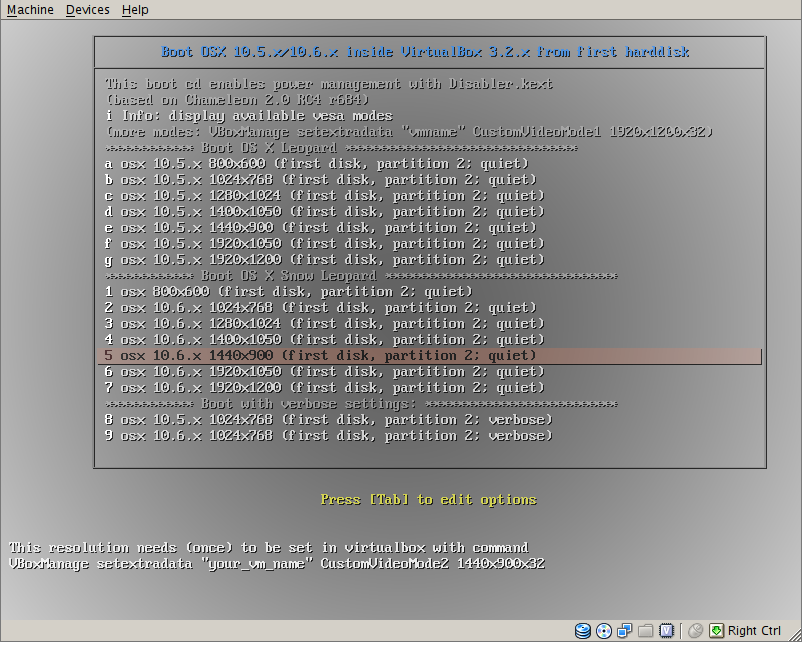
Based on this information osxboot.iso is a bootable cdrom image with

  • boot menu (syslinux based) to choose between
    800×600, 1024×768, 1280×1024
    and, if set as custom resoltions in virtualbox guest vm,
    1400×1050, 1440×900, 1920×1050, 1920×1200
    (VBoxManage setextradata "vmname" CustomVideoMode1 1920x1200x32)
  • boot menu to select silent or verbose boot
    (chameleon allows to add other flags)
  • default boot from second partition of first hard disk
    (which can be edited during boot)
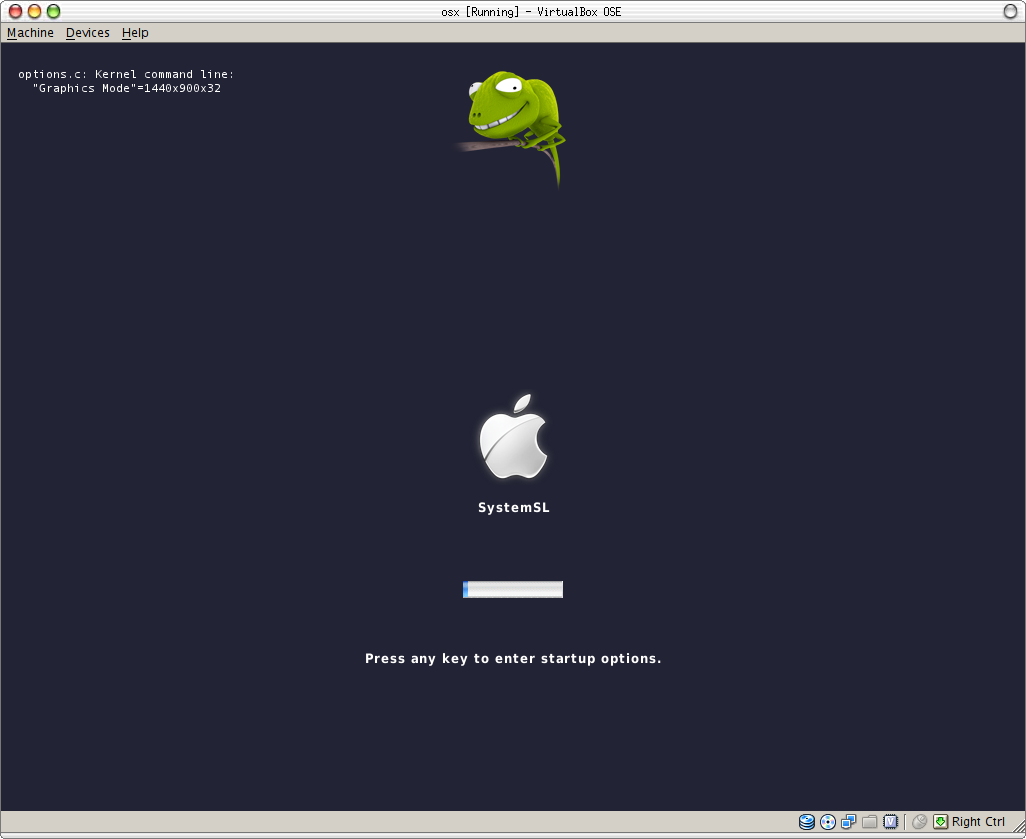
  • OS X 10.5, leopard, or OS X 10.6, snow leopard, on apple hardware, running as virtualbox guest:
    – only kext module Disabler.kext (part of chameleon distribution) is loaded (allows cpu sleep mode for vm guest)
    – leopard runs only inside a 64 bit version of virtualbox (tested with linux)
  • EFI has to be disabled in the system properties of the virtualbox guest
  • Seems to run stable if the hard disk inside the vm is attached to the virtual SATA hard disk controller
    (to access raw devices Use Host I/O Cache must be enabled for the SATA controller!)

The chameleon boot loader has been patched to set display resolution and verbosity as multiboot arguments:

  • resx=800 (defines horizontal resolution)
  • resy=600 (defines vertical resolution)
  • verbosity=0 / verbosity=1 (sets verbosity: -v flag)

Google, howto isolinux, should give answers how a bootable isolinux cdrom image can be created.

Known bug: “About this Mac” system information crashes.

Software used for this article: SPBLinux 2.4 live cd

In case you want to access usb attached storage media from a virtual machine (vm) running inside virtualbox there are 3 choices:

  1. Make the usb connection available to the vm.
  2. Make a shared folder to access data on the usb storage device.
  3. Give the vm direct access to the usb disk.

Using a shared folder has the advantage that configuration is straight forward (menu Device/Shared folder …). But

  • the host must handle the filesystem used on the usb storage device
  • the guest must have guest additions installed
  • performance is a bottleneck

Usb inside guest also has performance drawbacks.

So it is worth to fiddle with the command line to get direct access to disk partitions.

  • ls /dev/disk*
  • this displays all disk partions seen by OSX
  • in case finder displays the partition to be used by the vm (that is, OSX has automatically mounted this partition) you have to deactivate this partition with the OSX disk utility program
  • VBoxManage internalcommands createrawvmdk -filename yourpath/newdisk1.vmdk -rawdisk /dev/disk1
  • this creates a vmdk file which can be opened by virtualbox disk manager; this file gives access to disk1
    Use host I/o-Cache has to be enabled for the controller of this disk!

If the vm cannot be started because of disk access error the partitions of disk1 have to be deactivated again with the hard disk utility program.

The system disk /dev/disk0 would need root access rights; other disks can be accessed as user.

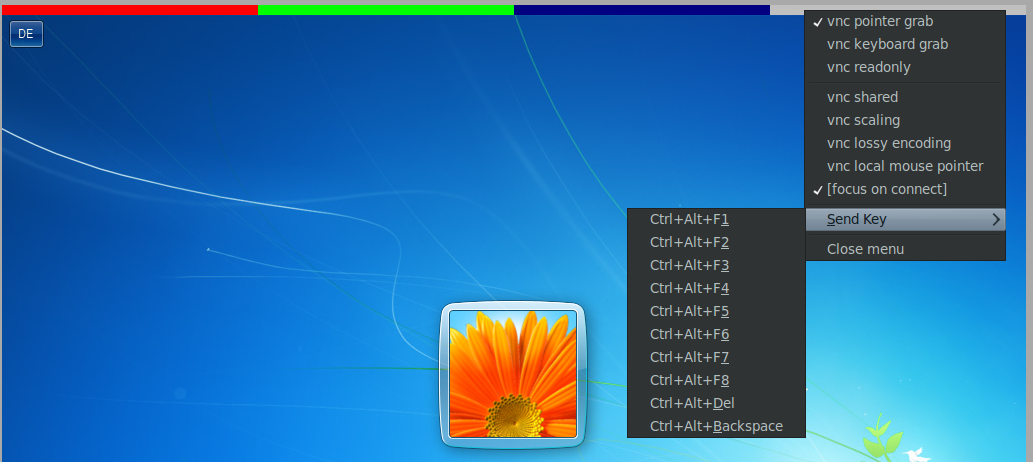
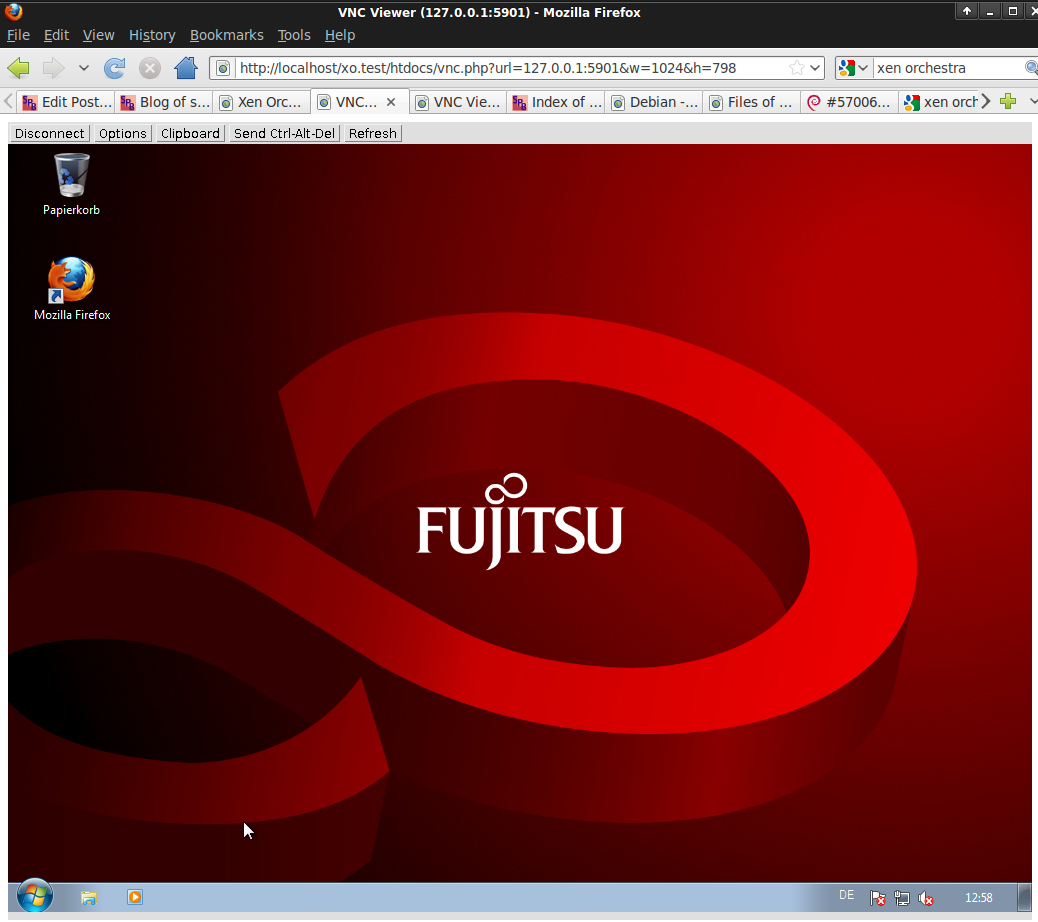
Time to put things together. Xen orchestra has now got a ‘vnc‘ link (like http://localhost/xo/htdocs/vnc.php?url=127.0.0.1:5901&name=w7b) which opens gtk vnc plugin (amd64 binary here). – This link is placed in section Misc of xen orchestra’s virtual machine detail window.

The configuration file of xen orchestra, xen-orchestra.conf, has got a section to control gtk vnc plugin. If a windows vm needs mouse grabbing, it can be set in this file. The handling of these settings is done in htdocs/vnc.php. If virtual machine w7b needs even more specific settings an additional file vnc_w7b.php can be used.

Compared to the description in this post vnc gtk plugin does now automatically grab the focus (keyboard immediately active after loading of html page; no need to click into vnc viewer window first) and a send keys menu has been added (0103-add_autofocus_and_sendkeys.diff).

(Build instructions remain the same except that after (updated) colortoolbar.patch.gz a second patch colortoolbar2.patch.gz has to be applied; updated amd64 debian archive: mozilla-gtk-vnc_0.3.10-6_amd64.deb).

There is one little additional patch to xen orchestra (03-add_vm_name_to_vnc_link.diff). The main changes are in vnc.php (compare previous post about xen orchestra). An updated zip archive with patched xen orchestra is here.

Xen virtual machines transmit their screen contents by vnc. A browser based viewer is the java vnc viewer plugin (see previous post). Advantage of java is that it runs on many platforms. However java tends to use a lot of RAM. On ubuntu 10.04 there is an alternative browser plugin which is gtk based: gtk viewer plugin.

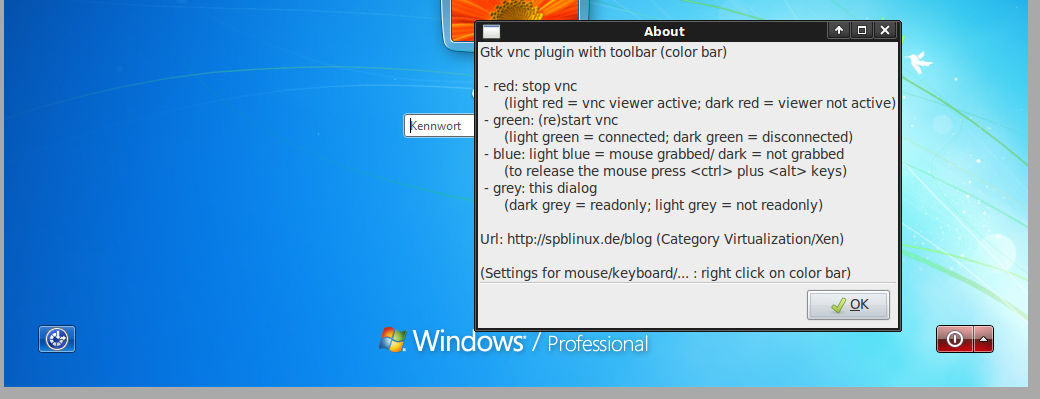
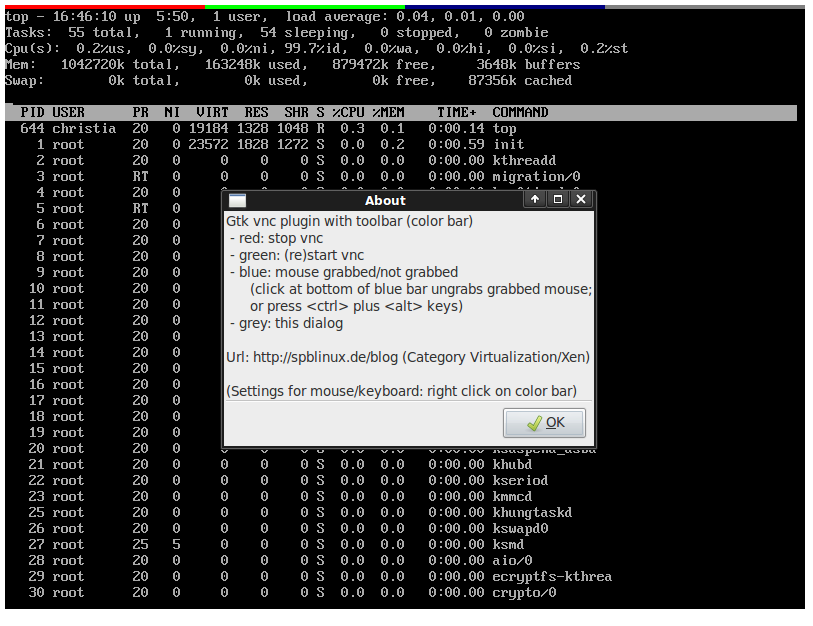
The gtk vnc plugin offers only very basic functions: just an authentication dialog and the vnc viewer window. – This post adds a minimalistic toolbar to the plugin (test.html, gtk-vnc-plugin.so, libgtk-vnc-1.0.so.0.0.1).

Steps to build the plugin described above:

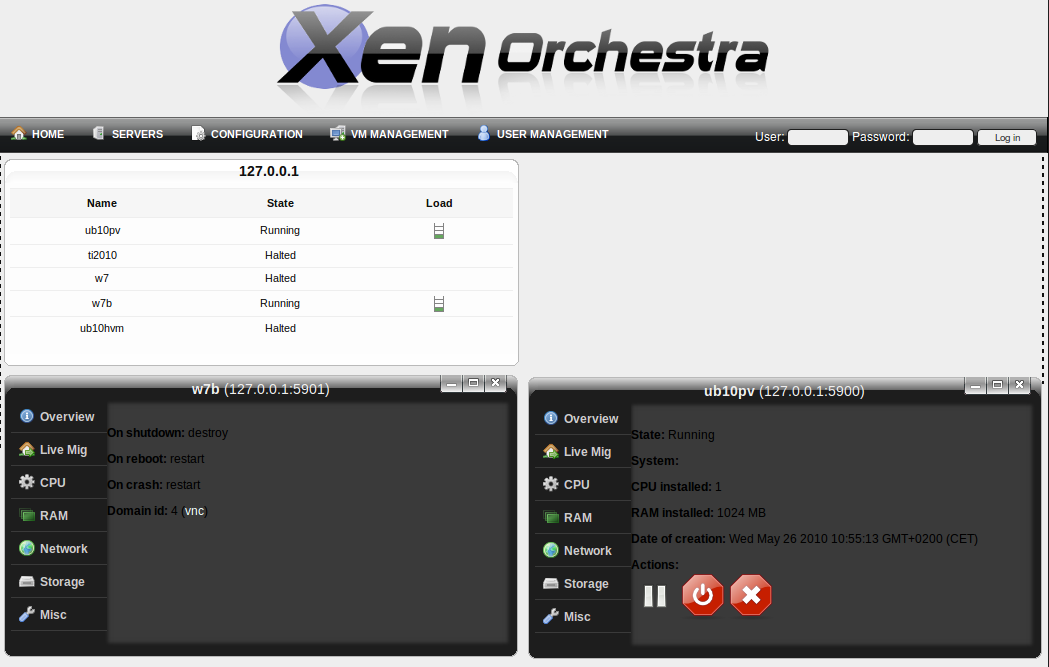
Looking for a graphical, browser based tool to manage xen 4.0 virtual machines I tried xen orchestra):

  • pro: needs only a web server with php (mysql optional); user interface not overloaded;  open source, well structured code.
  • con: only one detail window can be opened at the same time – needs patch; needs on ubuntu 10.04 a workaround for command xm new (see previous post).

The patch for multiple detail windows just had to replace some html tag id fields in htdocs/scripts/xo.js (01-xo.js.wId.diff).

Because I found it convenient to inspect my virtual machines with a browser based vnc viewer, I added a line to the detail window which displays the id and a link to vnc:
Domain id: 1 (vnc)
This patch uses the xen api to query the consoles of the virtual machine and looks up the ip address and the port of the vnc server connected to the console (02-add_vnc_link.diff, to be applied after 01-xo.js.wId.diff).

Patched version of xen orchestra: xen-orchestra-2010-03-22-patched.zip (local version of original file: xen-orchestra-2010-03-22.zip; local version of tightvnc java viewer: VncViewer.jar)

Minor, negligible bugs:

  • Network and Storage section of detail windows are empty.
  • If the machine running xen orchestra is too busy, xen orchestra displays an empty window; just press the refresh button of the browser to get the main window back.
  • ‘Login again’ button of java vnc viewer window does not reconnect (but refresh button of browser does).
  • Error messages are not displayed if a virtual machine fails to start (open a terminal and use the command xm start yourvm).
  • the vnc viewer window has a fixed hardcoded size (800×600 in htdocs/vnv.php); as workaround add &w=1024&h=798 to the browser address line to display a 1024×768 virtual machine.
  • non captured mouse does not work well in windows, unless graphics tablet mouse driver is installed (see next post about gtk-viewer plugin on linux).

Conclusion: I really appreciate the work of Olivier Lambert, the author of xen orchestra!