usage: some devices on internal network send diagnostic emails; keep those emails in internal network by setting up a smtp server which delivers emails directly to existing dovecot mail server using lmtp.

install postfix on qnap running dovecot
reference: https://wiki.qnap.com/wiki/Postfix

addgroup postfix
adduser -D -H -G postfix postfix
addgroup postdrop

export PATH=/opt/bin:/opt/sbin:$PATH
ln -s /opt/include /usr/include
cd /opt/src
wget –no-check-certificate https://de.postfix.org/ftpmirror/official/postfix-2.11.11.tar.gz
tar -xzf postfix-2.11.11.tar.gz
cd postfix-2.11.11

export CCARGS=’-I/opt/include -L/opt/lib -DDEF_COMMAND_DIR=\”/opt/sbin\” \
-I/opt/include/sasl -DUSE_SASL_AUTH -DDEF_SERVER_SASL_TYPE=\”dovecot\” \
-DHAS_SSL -I/opt/include/openssl -DUSE_TLS\
-DDEF_CONFIG_DIR=\”/opt/etc/postfix\” -DDEF_DAEMON_DIR=\”/opt/libexec/postfix\” -DDEF_DATA_DIR=\”/opt/var/lib/postfix\” \
-DDEF_MAILQ_PATH=\”/usr/bin/mailq\” -DDEF_HTML_DIR=\”/opt/share/doc/postfix/html\” -DDEF_MANPAGE_DIR=\”/opt/man\” \
-DDEF_NEWALIAS_PATH=\”/opt/bin/newaliases\” -DDEF_QUEUE_DIR=\”/opt/var/spool/postfix\” \
-DDEF_README_DIR=\”/opt/share/doc/postfix/readme\” -DDEF_SENDMAIL_PATH=\”/opt/sbin/sendmail\”‘

export AUXLIBS=’-lcrypto -lssl’

export LD_LIBRARY_PATH=/opt/lib
(else postconf, called by post-install, does not find libdb)

make tidy
make

replace #!/bin/sh by #!/opt/bin/bash in makedefs and post-install

edit post-install: search for chown
– replace chown root by chown admin
– in case of chown $owner (followed by chgrp $group) add these lines above the line with chown (at 2 places)
case $owner in root) owner=admin;; esac
case $group in root) group=administrators;; esac

make install

edit scripts:
/opt/libexec/postfix/postfix-script
replace #!/bin/sh by #!/opt/bin/bash
and add below
export PATH=/opt/bin:/opt/sbin:$PATH
export LD_LIBRARY_PATH=/opt/lib

postfix requires a domainname:

  • either workaround: so set in /etc/hosts of mail clients
    192.168.0.123 myserver myserver.local
    if hostname of the mailserver is myserver

    • set in /opt/etc/postfix/main.cf
      myhostname = myserver.local
      mydestination = myserver, myserver.local, localhost
      mynetworks = 127.0.0.0/8 192.168.123.0/24
  • or better: if you own mydomain.tld and if you have access to dns settings
    • create A record: mail.internal.mydomain.tld 192.168.0.123
    • create MX record: internal.mydomain.tld pointing to mail.internal.mydomain.tld
    • set in /opt/etc/postfix/main.cf
      myhostname = mail.internal.mydomain.tld
      mydestination = internal.mydomain.tld, myserver, myserver.local, localhost
      mynetworks = 127.0.0.0/8 192.168.123.0/24
    • use qnap web admin interface to create a normal user myname
      mailaddress is then myname@internal.mydomain.tld
      computers on 192.168.123.0/24 can send mails by smtp without authentication
      using mailserver mail.internal.mydomain.tld

for debugging: postfix logs to syslogd which does not run by default on qnap

  • start syslogd: syslogd
    display messages with: tail -f /var/log/messages
    when finished: killall syslogd
  • increase verbosity of postfix by editing /opt/libexec/postfix
    replace master -w by master -vvv -w
  • restart postfix:
    postfix stop
    postfix start

connect by lmtp with dovecot for non virtual user setup
mailbox_transport = lmtp:unix:private/dovecot-lmtp (in main.cf)
reference https://wiki2.dovecot.org/HowTo/PostfixAndDovecotSASL
and https://wiki2.dovecot.org/HowTo/PostfixDovecotLMTP

using /opt/var/spool/postfix/private/auth
and /opt/var/spool/postfix/private/dovecot-lmtp

after everything works non existing users can be rejected by postfix (main.cf)
smtpd_recipient_restrictions = reject_unverified_recipient

main config: service lmtp has to be enabled
if sasl auth is configured port 587 udp and tcp has to be added to etc services!
submission 587/tcp
submission 587/udp

so add to postfix start script
cat /etc/services |grep -q “[^0-9]587/tcp” || echo “submission 587/tcp” >>/etc/services
cat /etc/services |grep -q “[^0-9]587/udp” || echo “submission 587/udp” >>/etc/services
ln -s /opt/lib/libdb-4.2.so /lib
(last line because LD_LIBRARY_PATH=/opt/lib does not work for every subprocess of postfix)

problem when using dovecot with simple unix system users in default config:
postfix gives mail_user@mail_domain to lmtp but dovecot passdb of type shadow
and userdb of type passwd want mail_user (without @mail_domain suffix)

workaround: switch to passwd-file type of db for passdb and for userdb
which allows with args = username_format=%n to skip @mail_domain
Set in /opt/etc/dovecot/conf.d/auth-system.conf.ext:
service auth {
user = $default_internal_user
group = administrators
}
service auth-worker {
user = $default_internal_user
group = administrators
}

passdb {
driver = passwd-file
args = scheme=md5-crypt username_format=%n /etc/shadow
}
userdb {
driver = passwd-file
args = username_format=%n /etc/passwd
}

service auth {
unix_listener /opt/var/spool/postfix/private/auth {
mode = 0660
user = postfix
group = postfix
}
}

result: mails from local network can be sent to qnap users using smtp on port 25 without authentication

todo configure certs for tls; test smtp(s) auth
Debian Edu, that is skolelinux, aims to make the life of admins comfortable. Users, attached computers and more (stored by openldap) can be administrated by included gosa gui.

But trying to update the main server from debian jessie to debian stretch (at last 2017-08) broke gosa: Error while connecting to LDAP: Could not bind to cn=gosa-admin,ou=ldap-access,dc=skole,dc=skolelinux,dc=no (while operating on LDAP server ldaps://ldap.intern)

Because this system has been updated multiple times, the auto generated gosa ldap password was not available. And the existing hashes of the password did not work with debian stretch.

Installing updates one year later (2018-07) did not solve the access error. So it was time to dive into ldap authentication of gosa and skolelinux.

Step 1: The program slapcat allows to export the whole ldap database to a ldif file and does not require a password: export.ldif

Step 2: Edit export.ldif and replace the gosa-admin password:

  • As ldap novice I had to learn that this password has to be encrypted with slappasswd and gets stored in base64 format:
    echo “$(slappasswd)” |openssl base64
    (just enter the new password, eg. toptopsecret, twice, when asked)
  • Search for gosa-admin in export.ldif and replace the text after userPassword:: by the output generated by the command described above
  • Stop slapd (systemctl stop slapd), move /var/lib/ldap to /var/lib/ldap.orig, create /var/lib/ldap and copy DB_CONFIG from ldap.orig to ldap
  • Import the edited export.ldif file and fix ownership:
    slapadd -l export.ldif
    chown openldap:openldap /var/lib/ldap
  • Start slapd:
    systemctl start slapd
    and in case of errors
    systemctl status slapd
    journalctl -f -u slapd (maybe, set loglevel in /etc/ldap/slapd.conf from none to 65535)

Note: Step 2 might be used to migrate a skolelinux configuration from one server to another

Step 3: Add the new password as cleartext to gosa.conf (in /etc/gosa/):

  • Create backup copies of gosa.conf and gosa.secrets
  • Edit gosa.secrets so that it is an empty file
  • Edit gosa.conf and search for adminPassword and set the clear text password
    (twice: at snapshotAdminPassword and at adminPassword)
  • Restart webserver (because /etc/gosa/gosa.secrets gets included into apache config)
    apache2ctl graceful
  • Try login at https://yourip/gosa
  • If login is successful create again backup copies of gosa.conf and gosa.secrets

Step 4: Encrypt passwords in gosa.conf  with gosa-encrypt-passwords tool:

  • Remove /etc/gosa/gosa.secrets (after having made backups of gosa.secrets and gosa.conf)
  • Run gosa-encrypt-passwords
  • If successful restart webserver
    apache2ctl graceful
  • Try login at https://yourip/gosa

Done!

Looking for a simple web based app to take notes I discovered http://scrumblr.ca/ and a fork which added markdown tagging and import/export: https://framemo.org/.

Installation on debian stretch using apache2 as proxy allowing password protected access by ssl (described here and here):

  • apt-get install nodejs npm redis-server

  • mkdir -p /opt/nodejs
    cd /opt/nodejs
  • adduser –no-create-home –home /opt/nodejs/scrumblr –disabled-login –gecos “Scrumblr” scrumblr

  • git clone https://github.com/aliasaria/scrumblr.git

  • chown scrumblr: -R /var/www/scrumblr
    cd scrumblr

  • npm install
  • add scrumbler extensions of ldidry and test scrumblr on the console:
    • su scrumblr -s /bin/bash

    • git remote add fork https://github.com/ldidry/scrumblr/ git fetch fork git pull fork master
    • node server.js –port 4242 –baseurl /your_url_dir
      bugfix (“RangeError…”): edit config.js and change the line redis: …
      redis: argv.redis || ‘redis://127.0.0.1:6379’
  • netstat -ant reveals that scrumbler listens on all interfaces; so replace in server.js line server.listen(conf.port);
    server.listen(conf.port, ‘127.0.0.1’);
  • add a service description to /etc/systemd/system/scrumblr.service (reference) and enable scrumblr.service
    (and include startup argument  –baseurl /your_url_dir)
  • configure apache2 as proxy
    • enable modules: a2enmod proxy; a2enmod proxy_http
    • add a location section to virtual host config file in /etc/apache2/sites-available/
      <Location /your_url_dir>
      ProxyPass http://127.0.0.1:4242/your_url_dir
      ProxyPassReverse http://127.0.0.1:4242/your_url_dir
      </Location>
    • apache2ctl configtest; apache2ctl graceful
  • Open http(s)://your_server.tld/your_url_dir/
    • mini bug: the link to demo board is an absolute url and thus ignores proxy url; to fix this remove absolute path in scrumblr/views/home.jade at line p.home!=…
      p.home!= ‘<a href=”demo”>’ + ‘demo</a>’
    • here is a reference for the use of markdown syntax (e.g. insert links and images)
  • Todo: properly support editing on android and ios devices
    • ios recognizes doubleclick but cursor cannot be moved
    • android does not recognize doubleclick
    • scrumblr/client/script.js line card.children(‘.content’).editable…: if event: ‘dblclick’ gets replaced by
      event: ‘click’
      enables editing empty cards on mobile devices at the price that on the desktop dragging of a card activates edit mode
    • differentiate between ‘click’ for touch devices and ‘dblclick’ for other devices: content of diff file is here.

General:

  • install file server role: file management from other machine using \\servername\c$
    Import-Module Servermanager
    get-windowsfeature *
    add-windowsfeature fs-fileserver
  • blue console sconfig.cmd offers only Log Off or Shut Down / Restart.
    But pressing ctrl+alt+del offers Lock to lock the screen
  • install corefig to get some graphical management tools (docs here)
    set powershell to remote signed and unblock corefig ps* files:
    Set-ExecutionPolicy -ExecutionPolicy RemoteSigned
    Unblock-File -Path path_to_corefig\*.ps*
  • to open ports run powershell command
    New-NetFirewallRule -protocol tcp -localport 3551 -direction inbound -action allow -displayname apcupsd
    (rule is gets removed by Remove-NetFirewallRulle -displayname apcupsd)
  • to forward ports to another host run netsh command
    netsh interface portproxy add v4tov4 listenport=1234 listenaddress=10.0.1.234 connectport=5678 connectaddress=10.0.5.678
    (netsh interface portproxy delete v4tov4 listenport=1234 listenaddress=10.0.1.234)
  • to display id of a vm use powershell (reference):
    get-vm
    $vm=get-vm -name your_vm_name
    $vm.vmid
  • hyperv vm’s can be managed by 5nine Manager (free edition for up to 6(? only seen 2) local vm’s)
    or use ProHVM by probus-it.com (Standard edition is free; key file by email after registration; for multiple servers multiple key files can be obtained; works with local and remote hosts!)
  • this tool runs on hyper v server and includes a vm console
    (which may be put into HKLU/…/Run; fetch cmd args using process explorer)
  • to install drivers from inf files use
    pnputil -i -a path_to_inf_file.inf
  • some server 2012 core specific help for powershell is here

Server 2008r2 sp1 as guest vm:

  • easily moved from hard disk to vhdx by running disk2vhd tool inside physical 2008r2 server
    with a network share as target
  • important, if server 2008r2 includes hyper v role: bluescreen when hyper v 2012 guest tools are installed:
    Boot 2008r2 inside vm; use server manager to uninstall hyper-v role (needs 2 or more reboots); if server manager confirms successful removal of hyper v role, then install 2012 hyper v guest tools; insert hyperv guest iso using hyper v manager (5nine).

Special note for mainboard with adaptec softraid for onboard ata disks

  • server 2012r2 can be installed on such a raid drive, if sata raid driver is installed from usb during installation (e.g for amd boards with sp5100 chip)
  • adaptec storage manager runs inside hyper v 2012r2; email notifications can be configured; manual.
    (smtp access by ssl/tls via stunnel; stunnel -install configures stunnel as auto starting service; config: client=yes accept=127.0.0.1:25 connect=yourmailserver.tld:465)
  • smartctl of smartmontools seems to be unable to look into physical drives of this adaptec softraid devices (but possible with intel softraid)


First install composer.

  • dependencies: curl and git
  • download and verify composer-setup.php as described at composer homepage section download: https://getcomposer.org/download/
  • install as /usr/local/bin/composer: php composer-setup.php –install-dir=/usr/local/bin –filename=composer

Second install yii as described here: http://www.yiiframework.com/doc-2.0/guide-start-installation.html)

  • create an installation directory for the new yii project one level above document root, e.g. mystuff../
  • run composer inside directory mystuff:
    • composer global require “fxp/composer-asset-plugin:^1.3.1”
    • composer create-project –prefer-dist yiisoft/yii2-app-basic ./
    • If document root is defined as public_html ,and should be handled by yii framework, then run:
      ln -s yii/web/ public_html

If a database backend is used, yii code to handle tables can be auto generated using yii component gii.

  • configure config/web.php according to manual: http://www.yiiframework.com/doc-2.0/guide-start-gii.html
  • ensure that the web server has write (at least temporary) access to yii directory (chown -R www-data:www-data yii)
  • create the database table and add comments to each table field (which will become labels for table edit form fields)
  • create Model and CRUD using gii
  • uncomment primary index field id in views/your_table_name/index.php

To create pdf output use plugin yii-mpdf: https://github.com/kartik-v/yii2-mpdf

  • install plugin: composer require kartik-v/yii2-mpdf “1.0.1”
  • add pdf config to components array in config/web.pdf
    (and do not forget to add at the beginning of web.php: use kartik\mpdf\Pdf;)
  • for a view file views/your_table_name/view2.php add to controllers/yourTableNameController.php
    $pdf = Yii::$app->pdf;
    $pdf->content = $this->renderPartial(‘view2’, [‘model’ => $this->findModel($id)]);
    return $pdf->render();
  • to change formatting in dataset detail view
    • reference is source code: vendor/yiisoft/yii2/widgets/DetailView.php (and vendor/yiisoft/yii2/base/Widget.php):
      variables $template = ‘<tr><th{captionOptions}>{label}</th><td{contentOptions}>{value}</td></tr>’
      and $options = [‘class’ => ‘table table-striped table-bordered detail-view’]
    • thus add in file views/your_table_name/view2.php:
      DetailView::widget([ ‘model’ => $model, ‘template’ => ‘your_settings’,  ‘options’ => [your_settings], …

User authentication: http://www.yiiframework.com/doc-2.0/guide-security-authentication.html

(Plugin which allows user registration with email confirmation etc.: https://github.com/dektrium/yii2-user
https://code.tutsplus.com/tutorials/how-to-program-with-yii2-integrating-user-registration–cms-22974)

  • the standard base template of yii includes user authentication with hardcoded passwords in file
    models/User.php
  • some configuration is set in config/web.php: array components, sub array user, e.g. enableAutoLogin might be set to false
  • views/site/login.php defines the login page, e.g. remember me might be removed
  • example code to get name of logged in user:
    use app\models\User;
    if( !(Yii::$app->user->identity===null) ){echo User::findIdentity(Yii::$app->user->id)->username;} else {echo “guest”;}
  • if( !(Yii::$app->user->identity===null) && ‘100’===Yii::$app->user->id){echo “is admin”;}

Configure Mailer

  • set admin email address in config/params.php
  • configure mailer in config/web.php as described in
    https://code.tutsplus.com/tutorials/how-to-program-with-yii2-integrating-user-registration–cms-22974
  • edit contact form views/site/contact.php

Using a scanner often results in large files. OS X preview program allows to export to multiple formats. Choosing filetype pdf enables the option to apply quartz filters (generic export dialog; shortcut export to pdf does not show quartz filters in OS X 10.11.6). The builtin quartz filter reduce file size does create tiny documents but text might get unreadable.

But the builtin tool ColorSync allows to modify and create quartz filters (german howto with screenshots here). If a newly created filter should show up in the export dialog of the preview program it has to be copied from
/Users/your_name/Library/Filters to /Library/PDF Services
(tested in OS X 10.11.6).

Example of settings for small but (rather) readable pdf files:

  • Image: pixel per inch = 100; quality = high; all other settings empty
  • Image (gray): pixel per inch = 100; quality = high; all other settings empty
  • Image compression: jpeg; quality = slider one tick below medium position

To shrink multiple pdf files the custom quartz filter can be used from the command line:

  • Open Tools / Automator and create a new workflow
  • add action pdf / apply quartz filter
  • do not add other actions
  • save this workflow, e.g. as /yourpath/pdfreduce
  • copy all pdf files which should be converted to a new folder
  • open a terminal and cd to the folder with pdf files which should be shrinked
  • to convert one file run: automator -i yourdoc.pdf /yourpath/pdfreduce.workflow
  • multiple files: for f in *.pdf; do echo “$f”; automator -i “$f” pdfreduce.workflow; done

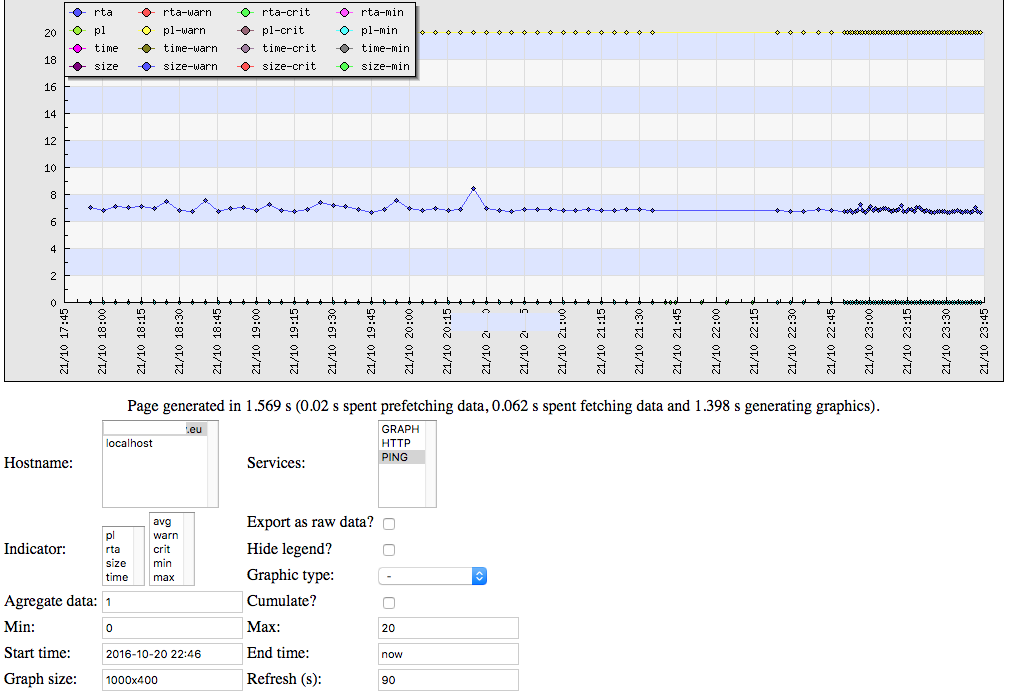
Nagios is a perfect server monitoring tool and a NAS runs 24 hours a day. ndo2db grapher displays realtime graphics.nagios_graph

Resources:

ndo2db grapher on exchange.nagios.org (Version 0.3.2) with a minor patch: ndographer.diff (background); installation as described on exchange.nagios.org

nagios 4.2.1 from github

nagios plugins 2.1.2 from nagios.org

ndoutils 2.1.1 from github (made by the makers of nagios): ndomod.o and ndo2db to transfer nagios data to  a mysql database.

jpgraph 3.0.7 from sourceforge

Hardware: qnap TS-119P II with Optware-IPKG app installed (gcc, automake, make, … installed); apache, php and mysql are part of qnap firmware (currently 4.2.2).

Installation notes:

Nagios:
configure options:
--prefix=/opt/nagios --enable-nanosleep --with-init-dir=/opt/etc/init.d
edit Makefile and replace

-o root -g root by -o admin -g administrators
run make all; make install; make install-init; make install-config; make install-commandmode
symlink /opt/nagios/share to /share/Web/nagios
edit /etc/config/apache/apache.conf and set Options +ExecCGI for directory /share/Web/nagios/cgi-bin
and add group nagios to qnap apache user: usermod -a -G nagios httpdusr

Nagios plugins:
configure options:
--prefix=/opt/nagios
run make all; make install (installs to /opt/nagios/sbin)
symlink /opt/nagios/sbin to /share/Web/nagios/cgi-bin

Ndoutils:
configure options:
--prefix=/opt --with-ndo2db-user=nagios --with-ndo2db-group=nagios --enable-mysql
copy ndomod-4x.o and ndo2db-4x to /opt/nagios/bin/ndomod.o and ndo2db
use phpmyadmin (installed as qnap app) to create the database and to import db/mysql.sql
(ipkg install mysql5 installs the mysql library and headers required to compile ndoutils with mysql support)
set the broker module in /opt/nagios/etc/nagios.cfg:
broker_module=/opt/nagios/bin/ndomod.o config_file=/opt/nagios/etc/ndomod.cfg
set
output=/opt/var/ndo.sock in ndomod.cfg and enter database name/user/password in ndo2db.cfg
and set lock_file=/opt/var/ndo2db.pid
run /opt/nagios/bin/ndo2db -c /opt/nagios/etc/ndo2db.cfg

Ndo2db grapher and jpgraph:
copy the tar archive content to /opt/nagios/share and create directory /opt/nagios/share/ndographer/jpgraph
patch choose_nagios.php and display_nagios_info.php using the patch file
copy the folder src contained in jgraph-3.0.7 archive  to /opt/nagios/share/ndographer/jpgraph/src
edit ndographer/nagios_graph_conf.inc.php (database name, user, password and
$cache_directory = “/opt/nagios/share$cache_htdocs”;
$pre_generated_image_path = “/opt/nagios/share/nagios-cache”;
create directory /opt/nagios/share/nagios-cache/cache and set owner to httpdusr
(and symlink /opt/nagios/share/nagios-cache to /share/Web/nagios-cache)

System configuration:

Configuration of nagios:
Either set http(s) authentication (see below) or disable authentication in /opt/nagios/etc/cgi.cfg
use_authentication=0 (warning: only if access to your_ip_adress/nagios is otherwise restricted!)
Add a notes_url line to every service which should display a graph
notes_url   /nagios/ndographer/display_nagios_info.php?name1[]=$HOSTNAME$&name2[]=$SERVICEDESC$
(displays in “service status details for a host a white icon (“view extra service notes) which opens the graphic; add other variables to set options like &max_value=20; first define settings by webinterface and check which variables are used in resulting url); to submit the changes to nagios run
/opt/etc/init.d/nagios reload

Start and stop nagios automatically:
1) enable optware start/stop scripts in /opt/etc/init.d (already described here; /dev/mtdblock5 instead of /dev/mtd5 with qnap firmware 4.2.2)
mkdir /tmp/config
mount /dev/mtdblock5 /tmp/config
– copy K010optstartstop.sh to /tmp/config (with extension ‘.sh’, not with extension.txt; partly found here and here)
chmod +x /tmp/config/K010optstartstop.sh
umount /tmp/config
2) nagios make install-init has created /opt/etc/init.d/nagios (=file daemon-init in nagios source folder)
3) create script file /opt/etc/init.d/S61nagios, make it executable and edit it:
#!/bin/sh
if [ -f /opt/etc/init.d/nagios ] ; then
[ -f /opt/nagios/etc/ssmtp.conf ] && mv /opt/nagios/etc/ssmtp.conf /opt/nagios/etc/ssmtp.conf.bak
cp /etc/config/ssmtp/ssmtp.conf /opt/nagios/etc/ && rm /opt/nagios/etc/ssmtp.conf.bak
/bin/chgrp nagios /opt/nagios/etc/ssmtp.conf
/opt/nagios/bin/ndo2db -c /opt/nagios/etc/ndo2db.cfg
/opt/etc/init.d/nagios start
fi

4) create script file /opt/etc/init.d/K39nagios, make it executable and edit it:
#!/bin/sh
if [ -f /opt/etc/init.d/nagios ] ; then
/opt/etc/init.d/nagios stop
killall ndo2db
fi

Http authentication:
All qnap apache helper binaries are in /usr/local/apache/bin
/usr/local/apache/bin/htpasswd -c /etc/config/apache/.htpasswd.nagios your_user_name
and add to /etc/config/apache/apache.conf:
<Directory “/share/Web/nagios”>
AuthType Basic
AuthName “password required”
AuthUserFile /etc/config/apache/.htpasswd.nagios
Require valid-user
</Directory>
and run
/usr/local/apache/bin/apachectl configtest
/usr/local/apache/bin/apachectl graceful
Then add your_user_name to /opt/nagios/etc/cgi.cfg:
use_authentication=1
authorized_for_system_information=nagiosadmin,your_user_name
authorized_for_configuration_information=nagiosadmin,your_user_name
authorized_for_system_commands=nagiosadmin,your_user_name
authorized_for_all_services=nagiosadmin,your_user_name
authorized_for_all_hosts=nagiosadmin,your_user_name
authorized_for_all_service_commands=nagiosadmin,your_user_name
authorized_for_all_host_commands=nagiosadmin,your_user_name
and run
/opt/etc/init.d/nagios configtest
/opt/etc/init.d/nagios reload

Configuration of sendmail on qnap:
qnap firmware installs ssmtp with config in /etc/config/ssmtp/
(and the start script S61nagios copies ssmtp.conf to /opt/nagios/etc/ and sets group nagios)
use webinterface: control panel /system settings /notification
to define the smtp server of your mail account
Then edit /etc/config/ssmtp/ssmtp.conf:
hostname=localhost
and /etc/config/ssmtp/revaliases (use same smtp server as in ssmtp.conf):
admin:you@yourdomain.org:your_smtp_server:your_smtp_port
nagios:you@yourdomain.org:your_smtp_server:your_smtp_port

and run (logged in as admin user):
echo "first message" |sendmail your_receiver@your_mailbox.org
This sends mails from admin as mails from you@yourdomain.org; (if this command runs without errors check your inbox and your spam folder).
Repeat this test as user nagios:
cp /etc/config/ssmtp/ssmtp.conf /opt/nagios/etc/; chgrp nagios /opt/nagios/etc/ssmtp.conf;
su nagios; echo "second message" |sendmail -C/opt/nagios/etc/ssmtp.conf your_receiver@your_mailbox.org; exit
Nagios notifications use the program printf which is in /opt/bin/printf (which gets installed with ipkg install coreutils)
and edit /opt/nagios/etc/objects/commands.cfg:
/usr/bin/printf has to be replaced by /opt/bin/printf
and the subject line has to be moved from sendmail to printf:
sendmail -s "........." has to be replaced by sendmail -C/opt/nagios/etc/ssmtp.conf
and printf "%b" "****** Nagios has to be replaced with printf "%b" "Subject: .........\n\n****** Nagios
Reload nagios with /opt/etc/init.d/nagios reload and try to send a forced host (or service) notification from nagios web interface: Host (or Service) state information
(Change debug level from 0 to 164 and debug_verbosity from 1 to 2 in /opt/nagios/etc/nagios.cfg to search bugs; debug logfile: /opt/nagios/var/nagios.debug; normal logfile: nagios.log)
The comments given by the user in notifications manually sent by the user may be included into the message using variable $NOTIFICATIONCOMMENT$ (reference).

Firmware update woes:

  • nagios section in /etc/config/apache/apache.config has to be reinserted
  • ipkg install procps; ipkg install inetutils: ping and ps in /opt/bin are kept
  • but nagios needs ping (and nagios initscript needs ps) non busysbox verion in /bin:
    • cd /bin; mv ping ping.bb; mv ps ps.bb; ln -s /opt/bin/ping ping; ln -s /opt/bin/ps ps

notes when trying to display xps files with evince
(however mupdf has less bugs and is supported by homebrew as well)

  • brew install evince does not support xps file format (xps option disabled at compile time)
    (check PATH variable, put /usr/local/bin as first entry if homebrew and macports are installed and errors like Python.h not found occur even if python has been freshly installed by homebrew)
  • an example for own brew formulas can be found here
  • copy /usr/local/Library/Taps/homebrew/homebrew-core/Formula/evince.rb to
    /usr/local/Library/Taps/homebrew/homebrew-x11/
  • edit /usr/local/Library/Taps/homebrew/homebrew-x11/evince.rb:
    uncomment the lines from bottle do to end using  # to disable prebuilt binaries
    add “–enable-xps”, to configure arguments
    and add line depends_on “libgxps”
  • run brew search evince which should find homebrew/x11/evince
  • run brew install homebrew/x11/evince

Bare metal recovery: Making the hard disk with image data bootable – update of this post; requires a licensed version of trueimage 2016 home (to be able to either download the acronis standalone iso from acronis or to create the iso with acronis media builder).

Step 1: Initialization of the disk using windows diskpart (compare this post); all data on this disk gets erased; tested with diskpart of windows 10:

  • list disk
  • select disk 1 (be careful to select the external disk which will be erased)
  • clean
  • convert gpt (automatically creates a 100 MB msr partition which remains unused)
  • create partition efi size=512
  • format fs=fat32 quick label=EFI
  • create partition primary size=2048 (bootloader and acronis)
  • create partition primary (use remaining space for image data)
  • exit

Step 2: Continue with linux; tested with ubuntu 16.04.

Step 2: Prepare and format the hard disk:

  • sudo su
  • gdisk -l /dev/sdb (be careful to select the external disk which has been prepared in step 1)
  • use df -h to show if any partitions of /dev/sdb are mounted and unmount them
  • gdisk /dev/sdb (be careful to select the external disk – replace sdb by your disk sd… in the instructions below!)
    • p
    • t
      3 <enter> (sets type of partition 3 to linux; do not set the data partition 4 to linux – else trueimage won’t allow to read/write tib files)
    • x
    • a
      3
      2 <enter> (set gpt partition flag bios bootable, used by extlinux boot loader)
    • w
  • mkfs.ext2 -L BootExtHD /dev/sdb3
  • mkfs.ext4 -L DataExtHD /dev/sdb4

Step 3: Install extlinux to make the hard disk bootable in bios mode:

  • mount /dev/sdb3 /mnt
  • mkdir /mnt/extlinux
  • extlinux -i /mnt/extlinux
  • touch /mnt/extlinux/extlinux.conf
  • mcedit /mnt/extlinux/extlinux.conf (compare these instructions on reboot.pro)
    • DEFAULT ti2016
      SAY booting TrueImage 2016 from USB disk with extlinux
      LABEL ti2016
      KERNEL /acronis/dat10.dat
      APPEND quiet force_modules=usbhid lib80211=off
      INITRD /acronis/dat11.dat,/acronis/dat12.dat
    • my machine crashes if lib80211.ko gets loaded (ti2016 build 6571)
      else parameter lib80211=off is not neccessary
  • dd if=/usr/lib/syslinux/mbr/gptmbr.bin of=/dev/sdb (add a syslinux/extlinux compatible mbr to the hard disk)

Step 4: Install grub to make the hard disk bootable in (u)efi secure boot mode; assumes that ubuntu 16.04 has been installed with grub efi boot loader and that loading of unsigned kernel (modules) has been enabled:
mokutil –disable-validation (has to be run as root, disables kernel validation at reboot; boot loader grub then complains insecure boot.)

  • mount /dev/sdb2 /mnt2
  • mkdir /mnt2/EFI
  • copy /boot/efi/EFI/ubuntu to /mnt2/EFI/ubuntu
  • edit /mnt2/EFI/ubuntu/grub.cfg
    • run: blkid /dev/sdb3
    • replace the uuid filesystem number in grub.cfg by the UUID number shown by blkid
    • remove grub hint hd0,gpt6 (in case your ubuntu (boot) partition is sda6)
    • replace set prefix=($root)’/boot/grub’
      by set prefix=($root)’/grub’
    • e.g.:
      search.fs_uuid 4164bfdd-bfbe-464a-9e7f-1ec096f84c2d root
      set prefix=($root)'/grub'
      configfile $prefix/grub.cfg
  • umount /mnt2
  • mkdir /mnt/grub
  • copy the contents of directory /boot/grub/ to /mnt/grub/
  • delete /mnt/grub/grubenv
  • edit /mnt/grub/grub.cfg
    • set default="0"
      set timeout="10"
    • taken from ubuntu:
      function load_video {
      if [ x$feature_all_video_module = xy ]; then
      insmod all_video
      else
      insmod efi_gop
      insmod efi_uga
      insmod ieee1275_fb
      insmod vbe
      insmod vga
      insmod video_bochs
      insmod video_cirrus
      fi
      }
    • taken from ubuntu (but replace filesystem UUID number ):
      font=unicode
      insmod part_gpt
      insmod ext2
      search --no-floppy --fs-uuid --set=root 4164bfdd-bfbe-464a-9e7f-1ec096f84c2d
      load_video
      gfxmode text
    • again using these instructions on reboot.pro:
      menuentry "Acronis TruImage Home 2016 on USB disk" {
      set quiet=1
      set gfxpayload=1024x768x32,1024x768
      set mbrcrcs=on
      # bug: kernel module lib80211 crashes kernel in build 6571 (ti 64bit)
      linux /acronis/dat10.dat lib80211=off quiet force_modules=usbhid
      initrd /acronis/dat11.dat /acronis/dat12.dat
      boot
      }

Step 5: Copy acronis trueimage 2016 from iso to hard disk:

  • mkdir /mnt/acronis
  • loop mount the acronis iso file (e.g. mount -o loop acronis.iso /mnt2)
  • copy the files dat10.dat, dat11.dat and dat12.dat to directory /mnt/acronis
  • umount /mnt

Step 6: enable to boot on a mac mini

  • The builtin boot selector of a mac mini expects the grub efi file inside the efi partition at it’s official place:
    EFI/boot/bootx64.efi (or EFI/boot/bootia32.efi: see step 7)
  • to configure grub as official boot loader simply copy
    MokManager.efi, shimx64.efi, grubx64.efi and grub.cfg
    from EFI/ubuntu/ to EFI/boot/ and
    rename shimx64.efi to bootx64.efi
  • Now the boot selector of OS X on a newer mac mini (e.g. late 2012) shows
    an USB disk with subtitle EFI Boot (keep alt/option key pressed on power on to start the boot selector)

Step 7 (optional): enable to boot on older mac minis (late 2007, 5.1)

  • These systems work with 32 bit efi (grub-mkimage -O i386-efi -d /usr/lib/grub/i386-efi -o grubia32.efi ...)
  • Trial & error showed that grubia32.efi created in ubuntu 16.04 (apt-get install grub-efi-ia32-bin) did load acronis true image, but keyboard and mouse remained disabled
  • Multiple sources (like this blog: My Solution How To Boot A Linux Live System) describe that grubia32.efi contained inside zip archive ISO-2-USB EFI-Booter for Mac 0.01 beta works fine
  • For some reason unknown to me this older version of grub does not block keyboard and mouse;
    but it’s command initrd does not load multiple files
  • Copy dat11.dat and dat12.dat into one file dat1112.dat:
    cp dat11.dat dat1112.dat
    cat dat12.dat >> dat1112.dat

    and in grub/grub.cfg replace
    initrd /acronis/dat11.dat /acronis/dat12.dat
    by
    initrd /acronis/dat1112.dat
  • Copy the older version of grub (local copy) to EFI/boot/bootia32.efi
  • Now it boots as described in step 6. But be prepared to wait 3 minutes until the efi32 bios has loaded the 85 MB initial ramdisk of acronis trueimage 2016

Step 8: Try to boot from this hard disk on efi and on bios systems.

  • Without step 6 on one of my systems the builtin boot selector did not show my usb disk,
    but it did show an entry boot from efi file:

    • this allowed to navigate into /EFI/ubuntu on the usb disk
    • then shimx64.efi had to be selected


Running a dual boot system with OS X and Windows 10 an ExFAT data exchange partition is useful.

But from time to time (after some months in my case) theExFAT partition is gone:

  • OS X and Windows 10 list a raw partition instead of an ExFAT partition

Repair in OS X using the terminal:

  • sudo su
  • diskutil list
    (this should display a “Microsoft Basic Data” partition with the size of the disappeared ExFAT partition;
    the name column is empty; the identifier like disk0s3 has to be used in the next step)
  • fsck_exfat disk0s3
    (replace disk0s3 by your ExFAT partition)
  • when asked by fsck_exfat to repair your “Main boot region” answer “y”
  • diskutil mount disk0s3
    (replace disk0s3 by your ExFAT partition)
  • now yourExFAT partition should be back in Finder
    (which can be verified on the console with: ls /Volumes)

Details taken from this discussion.

Repair attemps on Windows could use chkdsk d: /f
(replace d: with the windows drive letter of your disappeared ExFAT partition;
use <windows key> + x to open an administrative console.)